Setup/Add Bigrock Custom Domain Name With Blogger
Title : Setup/Add Bigrock Custom Domain Name With Blogger
link : Setup/Add Bigrock Custom Domain Name With Blogger
Setup/Add Bigrock Custom Domain Name With Blogger
After Choosing Good Domain Name For Your Blog, Here i we'll show how to setup bigrock custom domain name with blogger. If once you add custom domain name in blogger after that you can also create subdomain in bigrock and map it with blogger blog.


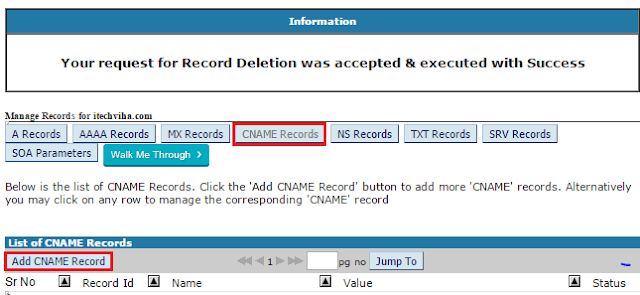
Step 3: New Popup Menu is display. Click on "A Record" and Click on "Add A Records".

Step 4: Now leave empty host name field, Add Destination IPv4 Address "216.239.32.21".
 Repeat these 3 more times and add following destination IPv4 Address for "A Records"


Steps For Map Bigrock Domain With Blogger
Step 1: Login With Your Bigrock Account And Choose Domain Which Want To Map With Blogger Blog.

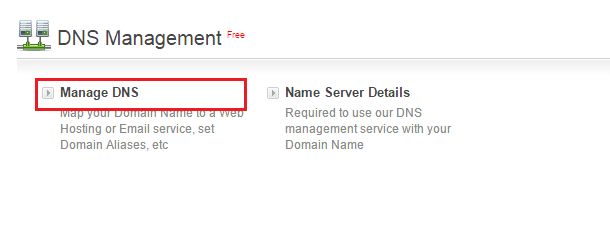
Step 2: Click on "Manage DNS".

Step 3: New Popup Menu is display. Click on "A Record" and Click on "Add A Records".

Step 4: Now leave empty host name field, Add Destination IPv4 Address "216.239.32.21".

- "216.239.34.21"
- "216.239.36.21"
- "216.239.38.21"

Step 5: After creating "A Record". Go to CNAME tab and click on "Add CNAME Record".

Step 6: In Host name, Write "WWW" and and insert "ghs.google.com" in value then click on Add Record.
After completing all above steps, you have to map your bigrock domain with your blogger blog and needs to verify your blog with bigrock.
Step 7: Login with your blogger account. Go to Setting>>Basic and click on Set Up Third Party URL.
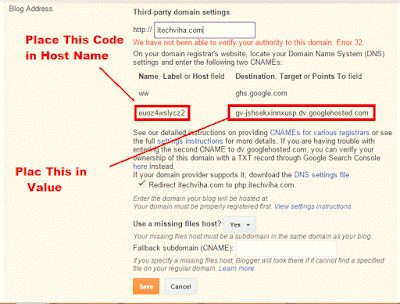
After That enter your domain name and click on save button. Then your blog ask to verify authority on that domain name. Now needs to create another CNAME record.
Step 8: Go to "CNAME record" and then click on "ADD CNAME RECORD". Place first code in host name and place second code in value. Now click on Add Record.
Step 9: After that needs to repeat step 7. Go to Setting Setting>>Basic and click on Set Up Third Party URL. Then enter your domain name and click on save button. At that time it not display any error. This process take some times to updates DNS setting.
Redirect Non-WWW to WWW
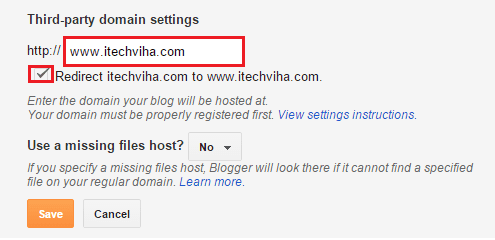
Step 10: After some time Login with your blogger account. Go to Setting>>Basic and click on EDIT button. Tick on Redirect itechviha.com to www.itechviha.com and click on save button.
You can also create subdomain in bigrock and map it with your blogger blog.
Thus the article Setup/Add Bigrock Custom Domain Name With Blogger
That's the article Setup/Add Bigrock Custom Domain Name With Blogger this time, hopefully it can be of benefit to all of you. well, see you in another article post.
You are now reading the article Setup/Add Bigrock Custom Domain Name With Blogger with the link address https://poccoll.blogspot.com/2015/09/setupadd-bigrock-custom-domain-name.html

 Posted by


No comments: