Show/Hide Blogger and Google+ Comments System With Toggle
Comments google plus WidgetsMany Blogger site owners received the new Google+ Comment System pretty negatively because it forced all commenting users to create their own Google+ account before they were able to write a comment. The Google+ Comment System on Blogger was convenient to writers, but discouraged many users from continuing to comment on blogs because they simply didn't want to use Google+. For those that did use Google+ to make a comment, Blogger would never email you and notify you that someone left a comment; you could go days or weeks without ever realizing that you never responded to a reader.
In addition to frustrating your audience, the Google+ Comment System on Blogger depended upon the URL of your blog post. By changing your URLs or moving around your blog posts internally, you run the risk of losing every one of your comments that was placed using Google+.
Previously, the only way to solve this problem was to disable the comment system through your account settings, thus giving up your ability to use their Google+ account. Now, there's an easy new way to have the best of both worlds. Allowing fans of Google+ as well as everyday blog readers to access all same features, you’ll be able to engage every visitor equally. You can respond to comments while still being able to communicate with other Google+ users outside of your site and take advantage of the Google+ Comment System on Blogger.

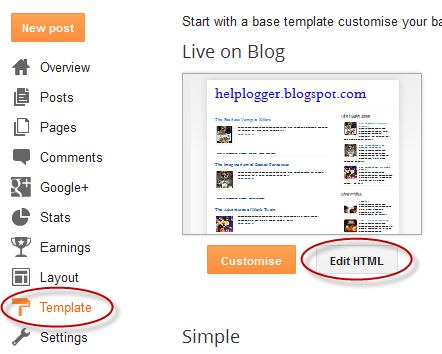
Step 1. Log into your Blogger account and select your blog > go to 'Template' and press the 'Edit HTML' button on the right side.
Step 2. Click anywhere inside the code area and press CTRL + F keys to open the editor's search box and search for the following code:
Note: data-width is for setting the width of the comment box, so the number (550) indicated there can be changed according to the design of your blog.
Step 4. Press the "Save Template" button located at the top of the editor and view your blog to see if you have successfully added Google+ commenting system to Blogger.
Please note that in order to make this work, you need to make sure that you are using a version of jQuery in your site. Otherwise, add this line just above the </head> tag using the HTML template editor:
In addition to frustrating your audience, the Google+ Comment System on Blogger depended upon the URL of your blog post. By changing your URLs or moving around your blog posts internally, you run the risk of losing every one of your comments that was placed using Google+.
Previously, the only way to solve this problem was to disable the comment system through your account settings, thus giving up your ability to use their Google+ account. Now, there's an easy new way to have the best of both worlds. Allowing fans of Google+ as well as everyday blog readers to access all same features, you’ll be able to engage every visitor equally. You can respond to comments while still being able to communicate with other Google+ users outside of your site and take advantage of the Google+ Comment System on Blogger.
How to Integrate Blogger and Google Plus Comments
To make the installation as simple as possible, I used inline jQuery and CSS, but who wants can change this code later. Also, the most accessible place I found to add it would be just after <b:include data='post' name='post'/>. So, let's start adding it:Step 1. Log into your Blogger account and select your blog > go to 'Template' and press the 'Edit HTML' button on the right side.
Step 2. Click anywhere inside the code area and press CTRL + F keys to open the editor's search box and search for the following code:
<b:include data='post' name='post'/>Step 3. Just after <b:include data='post' name='post'/> add the following code:
<b:if cond='data:blog.pageType == "item"'>
<style>#comments, #gplus-comments-visibility {display:none;} .comments-icons {background: url(https://blogger.googleusercontent.com/img/b/R29vZ2xl/AVvXsEhmNc2ubW_pOarv2k_6nvwaiUIcrhD_rf1fYGZvSfJZC0R-u1kIqU4Eq-tA8PdC9HuQWx1wpM8imqwtpnTwE-lRRYowOOBTRPU4gqu5QL3eO09v6bBYTGaqCK79hAm9fMyhuJfU0BCJgs9w/s1600/speech-bubble.png) no-repeat; font-size: 20px; font-family: "Arial Narrow",Arial,sans-serif; color: #555; font-weight: bold; padding: 18px 15px 0; height: 70px; } .comments-icons a img {vertical-align: middle;}</style>
<div class='comments-icons'>
Show Comments: <a class='show-hide-comments' href='javascript:void();' onclick='$("#gplus-comments-visibility").slideToggle();$("#comments").hide();'><img class='gplus-icon' height='35' src='https://blogger.googleusercontent.com/img/b/R29vZ2xl/AVvXsEi2sApTHIqLRPvXYLMsvoPNYzno8PH-tznz-WD5WjR6Icfn_LKhOPh5nA_19rCiE9xaCgEpXfpcMLcHUCdTbOItj79GHIAUACKXpc5byojtxnFU6QAJQsKJQ9KEJGejlJnIMmtgSL4PAqK7/s1600/google-plus-logo.png' width='35'/></a> OR <a class='show-hide-comments' href='javascript:void();' onclick='$("#comments").slideToggle();$("#gplus-comments-visibility").hide();'><img class='blogger-icon' height='35' src='https://blogger.googleusercontent.com/img/b/R29vZ2xl/AVvXsEjlDf0v_BygxO7luZ0769lAaPPfF1w_mZOeZ9ek3BhWmGNxid7ujIeZi95-WTZhgS7JUQHbIDi4amKINzeruQ6I3GxKjxO1DBMxghhXKrLiNLNEWFuddbdFALyz9f3CJHE12QBvWbLckTzJ/s1600/blogger-logo.png' width='35'/></a>
</div>
<div id='gplus-comments-visibility'>
<div class='g-comments' data-first_party_property='BLOGGER' data-view_type='FILTERED_POSTMOD' data-width='550' expr:data-href='data:post.url'/>
</div>
</b:if>
Note: data-width is for setting the width of the comment box, so the number (550) indicated there can be changed according to the design of your blog.
Step 4. Press the "Save Template" button located at the top of the editor and view your blog to see if you have successfully added Google+ commenting system to Blogger.
Please note that in order to make this work, you need to make sure that you are using a version of jQuery in your site. Otherwise, add this line just above the </head> tag using the HTML template editor:
<script src='https://ajax.googleapis.com/ajax/libs/jquery/1.6.4/jquery.min.js' type='text/javascript'/>


