Showing posts with label Widgets. Show all posts

Sunday, September 24, 2017

10 Best Popular Blogger Widgets and Plugins

Today I'm going to show you my great collection of blogger widgets and plugins which makes your blog look super cool, you can also call it "Cool Blogger Templates" or "Best Blogger Templates". However, I've named this a "10+ Best Popular Blogger Widgets and Plugins".


Blogger Widgets and Plugins

Actually, these are the codes which you can implement on blogger to get stylish blogger widgets or plugins.

Before Going Further-

• This is Why Jawbone Up3 Gadget is Better - Read

• Best Fitness tracker - Read

• All in one SEO Pack for Blogger - Read


Why Do We Need a Blogger Widgets and Plugins

We need a blogger widgets because, like wordpress, blogger doesn't provide option of plugins so I have sorted best blogger widgets and plugins that anyone can use freely.

Blogger have facility to add unlimited HTMl/Javascript codes, so the plugins that I have created is actually made from HTML and Javascript.

After implementing these widgets, you can easily see the best development of your blogger blog.

How to Install All Blogger Widgets and Plugins

We will show you the list of the best blogger widgets and plugins, so choose the best plugins which fits with your blog and then there is some installation process for every blogger widgets and plugins, you just need to go through the process and that's sit.

These all blogger widgets are very simple to use and easy to install, so without wasting your time, let's get to the point.

here are all plugins,

1. About Us Blogger Widgets

Blogger Widgets and Plugins

As You Can see the image above, check the features to know more about this widgets

Features of this Blogger Widgets

• You Can Set Image

• Shine Look

• Learn More Button

• Fully Customizable

How to Install "About Us Blogger Widgets"

Navigate to Blogger Dashboard>>Layout>>Add Gadgets>>HTML/Javascript and Paste the following code ( To Copy Code Click in the Box Below, Press CTRL + A and Copy It)


Edit the Description, edit image address and link the learn more button

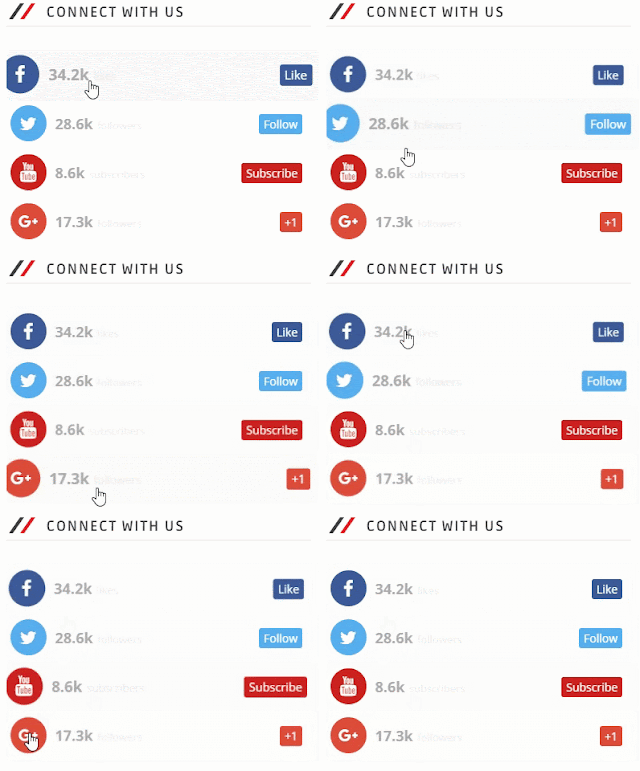
2. Social Media ICON With Hover Effect Widgets 

Blogger Widgets and Plugins

As you can see above, this looks so cool. We loves this widgets because it has unique hover effect which will increase its "Click Through Rates" (CTR).

Features of this Blogger Widgets

• Hover Effect

• Clean Design

• Easy To Install

How to Install "Social Media ICON With Hover Effect Widgets"

Navigate to Blogger Dashboard>>Layout>>Add Gadgets>>HTML/Javascript and Paste the following code ( To Copy Code Click in the Box Below, Press CTRL + A and Copy It)


Edit the "#" with your URLS


3. Accurate Weather Widgets for Blogger

Blogger Widgets and Plugins

This is Live Weather Widgets for Your Blog, It is 100% accurate and simple.

Features of this Blogger Widgets

• You Don't Need to Edit Anything

• Simple Installation

• 100% Accurate Weather

How to Install "Accurate Weather Widgets for Blogger"

Navigate to Blogger Dashboard>>Layout>>Add Gadgets>>HTML/Javascript and Paste the following code ( To Copy Code Click in the Box Below, Press CTRL + A and Copy It)


You Don't need to edit anything, just copy and paste as it is.


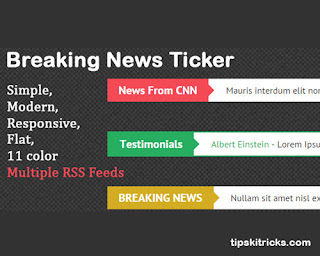
4. Breaking News Ticker Widgets for Blogger

Blogger Widgets and Plugins

Do you want to boost your views, If yes then stay tuned because today I will show you "How to Add Breaking News Ticker Widgets for Blogger", It is very easy and simple. There are few codes that will make a breaking news ticker.

Features of this Blogger Widgets

1. Beautiful Clean Design


2. Fully Automated Widgets

3. Make Visitors Engaging

4. Allow Visitors to Visit your Blog

5. Easy to Load (Very Lighweight)


How to Install "Breaking News Ticker Widgets for Blogger"

We have already told that how to install this blogger widgets so if you want to know click on install it.

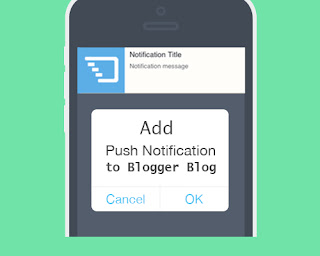
5. Push Notification Widgets/Plugins for Blogger

Blogger Widgets and Plugins


Do You Want to Add a Push Notification to Blogger Blog Because Push Notification Can Drive Visitors to Your Website When They are Off-Page. I Love Push Notification and It is the Best Way to Interact With Your Viewers. 


Features of this Blogger Widgets

• Control your Viewers, when they are Off Page.

• More Fast to Drive traffic than Any Method.

• More Subscribers, More Money

• Full Control With Your Subscriber

• Know About Your Customer Behavior

• Easy to Use

How to Install "Push Notification Widgets/Plugins for Blogger" 

We have already written about how to use and how to install so click install link below.


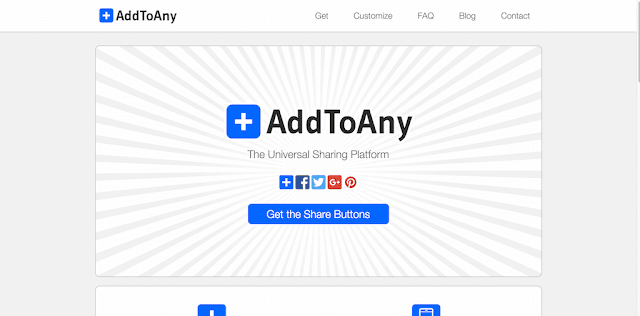
6. AddtoAny Social Sharing Widgets for Blogger
Blogger Widgets and Plugins
Source - https://colorlib.com


Addtoany is a service which allow you to add social share button to your websites. 

They provide clean and elegant social share button which allow visitors to share your post in one click.

Features of this Blogger Widgets

• Easy to Use

• Easy Installation

• All Social Options Available

How to Install "AddtoAny Social Sharing Widgets for Blogger"

Go this link and create your widgets, after creating widgets you will get codes, which you have to implement on your website

Navigate to Blogger Dashboard>>Layout>>Add Gadgets>>HTML/Javascript and Paste the code where you want to show that Share Button.

Get the Code to Install


7. Tawk.to Free Live Chat Widgets for Blogger

Blogger Widgets and Plugins


Tawk.to is a free live chat widget for blogger, it allows to serve unlimited visitors at a time.

I personally use tawk because it also helps to collect the emails. With this tool you can boost your conversion rate.

Features of this Blogger Widgets

• Easy to Install

• 100% Free Chat

• Allows to Serve Multiple Visitors

• Better than Any Live Chat

• Allow to send Pre-Written message 

How to Install "Tawk.to Free Live Chat Widgets for Blogger"

It is super easy to install just follow these steps-

1- Go to tawk.to and create your account

2- Verify your email and website

3- Add given tawk codes to your website

Note - Codes are Different for All Website, Check Your Email After Registration to get Your Codes

Congrats ! You are Ready to Chat with your Visitors

8. Popup Welcome Message Widgets for Blogger

Blogger Widgets and Plugins

This is simple approach of javascript to make a welcome message to your blog readers.

Features of this Blogger Widgets

• Simple Javascript

• Easy to Load

• Customizable

How to Install Popup "Welcome Message Blogger Widgets"

Navigate to Blogger Dashboard>>Layout>>Add Gadgets>>HTML/Javascript and Paste the following code.

Here is the Code - 

Code Starts

</script>
<script> function MYALERT() {
alert("Welcome to Tipskitricks.com"); } MYALERT()
</script>

Code END

Replace, Red text with your Website name.

9. Trending Post Widgets for Blogger

Blogger Widgets and Plugins


This is a beautiful trending post widgets for blogger, must install this blogger widgets.

Features of this Blogger Widgets

• Beautiful Design

• Easy to Install

• Automatic Verify Trending Post

How to Install "Trending Post Widgets for Blogger"

Navigate to Blogger Dashboard>>Theme>>Edit HTML>>Click Anywhere on the screen and press CTRl+F and search for </head> Paste the following code.

Code Starts

<script src='http://ajax.googleapis.com/ajax/libs/jquery/1.11.0/jquery.min.js'/> <script type='text/javascript'>

Code END

Note - This Widget is Make by knigulper.com

Now,


Navigate to Blogger Dashboard>>Layout>>Add Gadgets>>HTML/Javascript and Paste the following code.

Code Starts

<div class='widget-content'>
<div class="widget HTML" data-version="1" id="HTML7">
<h2 class="title">Trending Posts</h2>
<div class="widget-content">
<!-- start feedwind code --><script type="text/javascript">document.write('\x3Cscript type="text/javascript" src="' + ('https:' == document.location.protocol ? 'https://' : 'http://') + 'cdn.rawgit.com/knigulper/github.io/gh-pages/Knigulper.com/trendingrss.js">\x3C/script>');</script><script type="text/javascript" src="https://cdn.rawgit.com/knigulper/github.io/gh-pages/Knigulper.com/trendingrss.js"></script><script type="text/javascript">(function() {var params = {rssmikle_url: "http://www.tipskitricks.com",rssmikle_frame_width: "315",rssmikle_frame_height: "0",frame_height_by_article: "0",rssmikle_target: "_top",rssmikle_font: "Arial, Helvetica, sans-serif",rssmikle_font_size: "13",rssmikle_border: "on",responsive: "on",rssmikle_css_url: "",text_align: "left",text_align2: "left",corner: "on",scrollbar: "off",autoscroll: "on",scrolldirection: "up",scrollstep: "3",mcspeed: "20",sort: "Rnd",rssmikle_title: "off",rssmikle_title_sentence: "TRENDING POSTS",rssmikle_title_link: "",rssmikle_title_bgcolor: "#38A631",rssmikle_title_color: "#FFFFFF",rssmikle_title_bgimage: "",rssmikle_item_bgcolor: "#FFFFFF",rssmikle_item_bgimage: "",rssmikle_item_title_length: "55",rssmikle_item_title_color: "#1E991A",rssmikle_item_border_bottom: "on",rssmikle_item_description: "on",item_link: "off",rssmikle_item_description_length: "150",rssmikle_item_description_color: "1E88E6",rssmikle_item_date: "gl1",rssmikle_timezone: "Etc/GMT",datetime_format: "%b %e, %Y %l:%M %p",item_description_style: "text+tn",item_thumbnail: "crop",item_thumbnail_selection: "auto",article_num: "25",rssmikle_item_podcast: "off",keyword_inc: "",keyword_exc: ""};feedwind_show_widget_iframe(params);})();</script><iframe height="552" width="100%" src="http://feed.mikle.com/widget/?rssmikle_url=http%3A%2F%2Fwww.tipskitricks.com&amp;rssmikle_frame_width=315&amp;rssmikle_frame_height=550&amp;frame_height_by_article=0&amp;rssmikle_target=_top&amp;rssmikle_font=Arial%2C%20Helvetica%2C%20sans-serif&amp;rssmikle_font_size=13&amp;rssmikle_border=on&amp;responsive=on&amp;text_align=left&amp;text_align2=left&amp;corner=on&amp;scrollbar=on&amp;autoscroll=on&amp;scrolldirection=up&amp;scrollstep=3&amp;mcspeed=20&amp;sort=Rnd&amp;rssmikle_title=off&amp;rssmikle_title_sentence=TRENDING%20POSTS&amp;rssmikle_title_bgcolor=%2338A631&amp;rssmikle_title_color=%23FFFFFF&amp;rssmikle_item_bgcolor=%23FFFFFF&amp;rssmikle_item_title_length=55&amp;rssmikle_item_title_color=%231E991A&amp;rssmikle_item_border_bottom=on&amp;rssmikle_item_description=on&amp;item_link=off&amp;rssmikle_item_description_length=150&amp;rssmikle_item_description_color=%23000000&amp;rssmikle_item_date=gl1&amp;rssmikle_timezone=Etc%2FGMT&amp;datetime_format=%25b%20%25e%2C%20%25Y%20%25l%3A%25M%20%25p&amp;item_description_style=text%2Btn&amp;item_thumbnail=crop&amp;item_thumbnail_selection=auto&amp;article_num=25&amp;rssmikle_item_podcast=off&amp;" scrolling="no" name="rssmikle_frame" marginwidth="0" marginheight="0" vspace="0" hspace="0" frameborder="0"></iframe><div style="font-size:10px; text-align:center; "><a href="http://www.knigulper.com" style="color:#000000;">Knigulper Trends</a><!--Please display the above link in your web page according to Terms of Service.--></div><!-- end feedwind code --><!--  end  feedwind code -->
</div>
<div class="clear"></div></div>
</div>
<div class='clear'></div>

Code Ended

Now, Change the Red Text with Yours

Note - Paste this Code where your want to Save your Popular Posts

10. Responsive Banner Ads Widgets for Blogger

Blogger Widgets and Plugins


Do you want to set your own banner ads on blogger, if yes then this widgets is good for you, let's see it's features.

Features of this Blogger Widgets

• Responsive (If Theme is Responsive)

• Fits on Any Size

• Easy to Install

How to Install "Responsive Banner Ads Widgets for Blogger"

Navigate to Blogger Dashboard>>Layout>>Add Gadgets>>HTML/Javascript and Paste the following code.

Code Starts


<a href="#">
<img border="1" alt="Your Alternate Text" src="Banner Image address #"/></a>

Code Ends

• Change "#" with your clickable link

• Change Alternate Text with your Description

• Also, Enter Image Address

so, that's sit.

Our SEO Tutorial

• What is Social Bookmarking in SEO - Read

• Journey to Become SEo Expert - Read

• Ultimate SEO Pack for Blogger - Read

Hope, you have liked this collection, if you have any widgets then comment down below.

Add Breaking News Ticker Widgets for Blogger

Do you want to boost your views, If yes then stay tuned because today I will show you "How to Add Breaking News Ticker Widgets for Blogger", It is very easy and simple. There are few codes that will make a breaking news ticker.
Breaking News Ticker Widgets

News Ticker are one of the popular ways to increase your bounce rate and get more views to your blog, If you will add news ticker to your blog then you will se your bounce rate will be down which is good for any blog.

Before moving ahead we have more widgets for you - 

• Integerate Live Chat to Your Blog - Read Now

• Create Eye Catching Video for Your Business - Read Now

When you add following breaking news ticker widgets then it will automatically show your recent post so you don't have to update this plugin.


Note - This Widgets is only For Blogspot Blogs

Without wasting your time let's go straight to the point that what is the benifits, what are features, how to install this to your blogspot blog of this breaking news ticker widgets for blogger.

Also we will help you if you can't install this to your blog and at last we will wrap up with conclusion.

Benifits of Breaking News Ticker Widgets for Blogger

Here are the benifits of this breaking news ticker widgets -

1. Your Blog Looks Professional

2. You Don't Need to Update Everytime

3. Your Blog Will Get Good Bounce Rate

4. Hover Links Will be Applied on Widgets

5. This Code made with Javascript/HTML which helps to Load Flawlessly

Features of Breaking News Ticker Widgets for Blogger

Breaking News Ticker Widgets


1. Beautiful Clean Design

2. Fully Automated Widgets


4. Allow Visitors to Visit your Blog

5. Easy to Load (Very Lighweight)

How to Add/Install Breaking News Ticker Widgets for Blogger

1. To install this breaking news ticker widgets for blogger, you need to go to your blogger dashboard and then, Theme >> Edit HTML

2. Press Anywhere on the Text and press CTRL+F and then Find </style>, now copy and paste the below code just before </style>


3. Now Find, </body> tag, copy and paste the below code just before it.


4. Now the 4th and the last step, copy the below code and paste wherever you want to show the "Breaking News Ticker Widgets"


Note - If You Want to Show the ticker to the Top of the Page then Paste the Above code just after <body> tag

5. Now Click SAVE  button.

Congrats !! You Have Successfully Installed the Breaking News Ticker Widgets for Blogger Blog

More Help Related to Breaking News Ticker Widgets for Blogger

If You are facing any problems, while installing then feel free to comment your problem and I will help you for sure.

Do's and Don'ts

• Please Don't Forget to click Save Button

• Don't Edit the Code

• Please Read all the Instruction Very Carefully

• Make Sure You Implement the Code in the Correct Section

• Backup your Templates, Before Implementing this Code

Conclusion

Wrapping Up to say that this iis one of the famous widgets which look like news websites, if you are blogger then you can use to show recent post and if you are news website owner then it is for you.

This breaking news ticker widgets is fully automatic and easy to install within few clicks, you don't need more codes to install it. Only simpler codes are enough to make these kind of Widgets.

This Breaking News Ticker Widgets Will Help you to Achieve Good Bounce Rate and Surely Boost Your Views too.

We Have More Widgets, Plugins, Blogging Tools 

• How to Add Web Push Notification for Blogger - Read Now

• Ultimate All in One SEO Pack for Blogger (Must Watch) - Read Now

Breaking News Ticker Widgets
• Create Simple Sticky Sidebar for Blogger - Read Now

• 11 Blogging Tools that Every Blogger Should Use - Read Now

Do You Have Any tools then Share it in Comments Below, We Will Glad to Share it.

Friday, November 25, 2016

5 Best Custom Blogger Contact Form Widgets

In the past, adding a custom contact form for Blogger was quite a complex process, and many bloggers were forced to use third party websites. However, even after Blogger launched its own contact form gadget, it was still considered as highly inadequate. This is because the official gadget would only be implemented on the footer the sidebar. Most bloggers preferred having a separate blogger contact form placed on its own page to make their blogs appear well arranged and more professional as well.

Having a well laid-out Blogger contact form is very important. This is the tool that visitors, companies, and brands can use to contact you and it is simply a must-have feature for every blogger. If you are not comfortable with sharing your main email address directly on your blog, then a custom Blogger contact form offers an effective way in which people can easily reach you.
5 Best Custom Blogger Contact Form Widgets

Why you should use a Blogger Contact Form?

If you are still stuck on third party providers, you should definitely consider switching to the official custom contact form for Blogger since it has various unique benefits, like:
  • Messages are delivered immediately - As the blog administrator, you will receive a message immediately the visitor clicks send.
  • Reliable - It is the official form developed by Blogger, which makes it more trustworthy and reliable way to initiate contact as compared to using third-party services.
  • Questions - The contact form offers a platform for your visitors to ask specific questions that they might have regarding the blog you wrote or your business in general. It can be an excellent way of capturing leads and even lead to conversions if you are selling a certain product or service.
  • Feedback - Visitors can easily comment on your blog by leaving their feedback through your contact form. This feedback can help you determine which post to do next or what areas to address based on the visitors' comments.
  • Information or service request - For those who are using the blog as a way of marketing a product or service, potential clients can use the custom contact form for Blogger to reach out and request additional information.

How to Add Blogger Contact Form Gadget

Before adding a custom Blogger contact form to a static page, we need to add the default contact form in the blog's sidebar to make it functional:

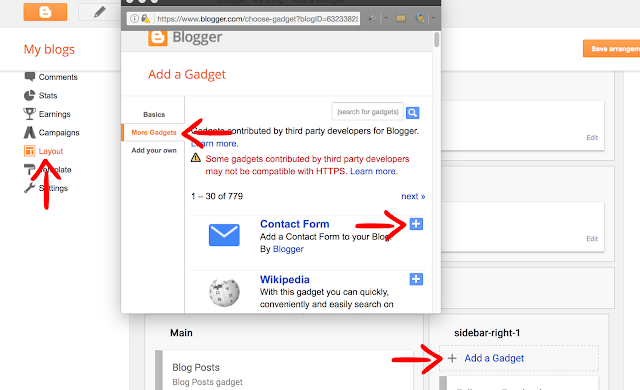
1. Log into your Blogger dashboard and go to "Layout" > click on the "Add a gadget" link on the page elements area.

2. Select "More Gadgets" below the "Basics" tab and click the "+" button to add the Contact Form Gadget.

blogger contact form

Hiding Blogger Contact Form from the Sidebar

Once the contact form has been added, next step is to hide it so that it will appear only in the static page.

1. Go to "Template" and press the "Edit HTML" button. Once the code editor opens, click anywhere inside the code area and press CTRL + F keys (or Command + F for mac) to open the search box.

2. Type or paste the following tag inside the search box and hit Enter to find it:
]]></b:skin>
3. Just above the ]]></b:skin> tag, add this CSS code:
#ContactForm1{display: none !important;}
4. Click the "Save template" button on the upper left side and view your blog. The contact form widget should be gone.

Adding Custom Blogger Contact Form in a Static Page

Finally, now that we enabled the functionality of the contact form, let's add a custom contact form in our Blogger blog...

1. Go to "Pages" and click the "New page" button. If you already have a Contact us page, just click the "Edit" link below the page title.

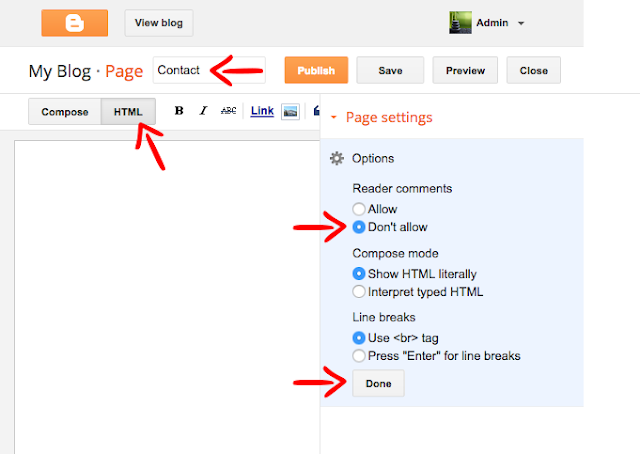
2. Once the Page editor opens, fill up the page title with Contact/Contact Us or any title you want to show. It is recommended doing this before anything in order to make the permalink SEO friendly.

3. Click on the HTML tab as there we will add the code to make the custom Blogger contact form work. On the right site, change the Page settings to hide ("Don't allow" or "Don't allow, hide existing") the reader comments, then click the "Done" button:

contact static page

4. Below are 5 custom Blogger contact form styles. Pick your favorite and copy the code provided, then paste the code inside the HTML box of your page editor:


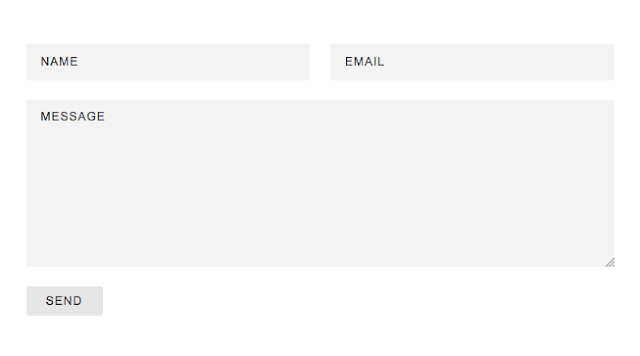
Simple Contact Form

custom blogger contact form

<style type="text/css">
.contact-form-widget{margin-left:auto;margin-right:auto;width:600px;max-width:100%;padding:40px 0}.contactf-name,.contactf-email{float:left;width:48.25%}.contactf-name{margin-right:3.5%}.contact-form-name,.contact-form-email,.contact-form-email-message,.contact-form-name:hover,.contact-form-name:focus,.contact-form-email:hover,.contact-form-email:focus,.contact-form-email-message:hover,.contact-form-email-message:focus{width:100%;max-width:100%;margin:0 0 20px;padding:10px 15px;font-size:12px;letter-spacing:1px;color:#444;background:#F3F3F3;border:medium none;-webkit-box-shadow:none;-moz-box-shadow:none;box-shadow:none}.contact-form-name,.contact-form-email{height:37px}.contact-form-email-message{height:170px}.contact-form-button-submit,.contact-form-button-submit:hover{width:13%;height:30px;font:normal 12px Arial;letter-spacing:1px;color:#444;display:block;outline:none;margin-bottom:20px;text-align:center;background:#E6E6E6;border:0;cursor:pointer}.contact-form-button-submit:active{outline:none;-webkit-box-shadow:none;box-shadow:none}.contact-form-cross{border:medium none!important;box-shadow:none!important;padding:0!important;height:11px !important;width:11px !important;}
</style>

<div class="widget ContactForm" id="ContactForm22"><div class="contact-form-widget"><div class="form"><form name="contact-form"><div class="contactf-name"><input class="contact-form-name" id="ContactForm1_contact-form-name" name="name" size="30" type="text" value="NAME" onblur='if (this.value == "") {this.value = "NAME";}' onfocus='if (this.value == "NAME") {this.value = "";}'  /></div><div class="contactf-email"><input class="contact-form-email" id="ContactForm1_contact-form-email" name="email" size="30" type="text" value="EMAIL" onblur='if (this.value == "") {this.value = "EMAIL";}' onfocus='if (this.value == "EMAIL") {this.value = "";}'/></div><div style="clear:both"></div><div class="contactf-message"><textarea class="contact-form-email-message" cols="25" id="ContactForm1_contact-form-email-message" name="email-message" rows="5" value="MESSAGE" onblur='if (this.value == "") {this.value = "MESSAGE";}' onfocus='if (this.value == "MESSAGE") {this.value = "";}'></textarea></div><input class="contact-form-button contact-form-button-submit" id="ContactForm1_contact-form-submit" type="button" value="SEND" /><div class="contact-form-error-message" id="ContactForm1_contact-form-error-message"></div><div class="contact-form-success-message" id="ContactForm1_contact-form-success-message"></div></form></div></div></div>

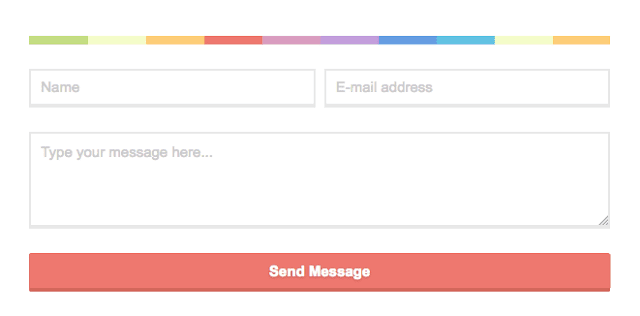
Contact form with CSS rainbow divider

colorful contact form for Blogger

<style type="text/css">
.contact-form-widget{margin-left:auto;margin-right:auto;width:600px;max-width:100%;padding:0}hr{position:relative;height:.75em;border:0;overflow:hidden;margin:0}hr:before{content:"";display:block;position:absolute;top:0;left:0;height:.75em;width:5.1em;background:#C4DD83;box-shadow:5em 0 0 0 #F4FCC9,10em 0 0 0 #FDCD78,15em 0 0 0 #ED786F,20em 0 0 0 #D99DBF,25em 0 0 0 #C39EDC,30em 0 0 0 #679DE2,35em 0 0 0 #62C2E3,40em 0 0 0 #F4FCC9,45em 0 0 0 #FDCD78,50em 0 0 0 #ED786F,55em 0 0 0 #D99DBF,60em 0 0 0 #C39EDC}.contactf-name,.contactf-email{float:left;width:49.25%}.contactf-name{margin-right:1.5%}.contact-form-name,.contact-form-email,.contact-form-email-message,.contact-form-name:hover,.contact-form-name:focus,.contact-form-email:hover,.contact-form-email:focus,.contact-form-email-message:hover,.contact-form-email-message:focus{width:100%;max-width:100%;margin:25px 0 0;padding:10px;font-size:15px;color:#ccc;border-color:#E8E8E8;border-width:2px 2px 4px;-webkit-box-shadow:none;-moz-box-shadow:none;box-shadow:none}.contact-form-name,.contact-form-email{height:40px}.contact-form-email-message{height:100px}.contact-form-button-submit,.contact-form-button-submit:hover{margin-top:25px;width:100%;height:40px;font-size:15px;color:#fff;text-align:center;text-shadow:0 1px 2px rgba(0,0,0,0.25);background:#EE786F;border:0;border-bottom:2px solid #D4685C;outline:none;cursor:pointer;-webkit-box-shadow:inset 0 -2px #D4685C;box-shadow:inset 0 -2px #D4685C}.contact-form-button-submit:active{top:1px;outline:none;-webkit-box-shadow:none;box-shadow:none}.contact-form-cross{border:medium none !important;box-shadow:none !important;padding:0 !important;height:11px !important;width:11px !important;}
</style>
<div class="widget ContactForm" id="ContactForm22"><div class="contact-form-widget"><hr><div class="form"><form name="contact-form"><div class="contactf-name"><input class="contact-form-name" id="ContactForm1_contact-form-name" name="Name" size="30" type="text" value="Name" onblur='if (this.value == "") {this.value = "Name";}' onfocus='if (this.value == "Name") {this.value = "";}'/></div><div class="contactf-email"><input class="contact-form-email" id="ContactForm1_contact-form-email" name="E-mail address" size="30" type="text" value="E-mail address" onblur='if (this.value == "") {this.value = "E-mail address";}' onfocus='if (this.value == "E-mail address") {this.value = "";}'/></div><div style="clear:both"></div><div class="contactf-message"><textarea class="contact-form-email-message" cols="25" id="ContactForm1_contact-form-email-message" name="Type your message here..." rows="5" type="text" value="Type your message here..." onblur='if (this.value == "") {this.value = "Type your message here...";}' onfocus='if (this.value == "Type your message here...") {this.value = "";}'></textarea><input class="contact-form-button contact-form-button-submit" id="ContactForm1_contact-form-submit" type="button" value="Send Message" /><div class="contact-form-error-message" id="ContactForm1_contact-form-error-message"></div><div class="contact-form-success-message" id="ContactForm1_contact-form-success-message"></div></div></form></div></div></div>

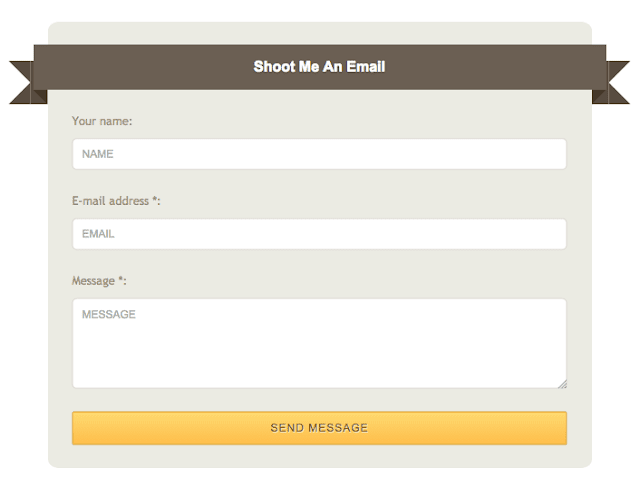
Blogger Contact Form with CSS Ribbon

contact form with ribbon

<style type="text/css">
.widget.ContactForm{z-index:1}.contact-form-widget{margin-left:auto;margin-right:auto;width:600px;max-width:100%;padding:25px 0;background:#EBEBE3;-webkit-border-radius:2%;-moz-border-radius:2%;border-radius:2%}.contact-form-widget .form{width:91%;margin:0 auto}.ribbon{font:16px Arial;text-transform:capitalize;text-shadow:0 1px 2px rgba(0,0,0,0.25);position:relative;background:#6B5F53;color:#fff;text-align:center;padding:1em 2em;margin:0 -16px}.ribbon:before,.ribbon:after{content:"";position:absolute;display:block;bottom:-1em;border:1.5em solid #584C40;z-index:-1}.ribbon:before{left:-1.7em;border-right-width:1.2em;border-left-color:transparent}.ribbon:after{right:-1.7em;border-left-width:1.2em;border-right-color:transparent}.ribbon .ribbon-content:before,.ribbon .ribbon-content:after{content:"";position:absolute;display:block;border-style:solid;border-color:#42362A transparent transparent;bottom:-1em}.ribbon .ribbon-content:before{left:0;border-width:1em 0 0 1em}.ribbon .ribbon-content:after{right:0;border-width:1em 1em 0 0}.contactf-name,.contactf-email,.contactf-message{text-align:left;margin-top:25px;color:#a1937b;font-size:13px}.contactf-name,.contactf-email{float:left;width:100%}.contact-form-name,.contact-form-email,.contact-form-email-message,.contact-form-name:hover,.contact-form-name:focus,.contact-form-email:hover,.contact-form-email:focus,.contact-form-email-message:hover,.contact-form-email-message:focus{width:100%;max-width:100%;margin:10px 0 0;padding:10px;font-size:12px;color:#aaa;border-color:#DBD6D1;border-width:1px;box-shadow:none;-webkit-border-radius:5px;-moz-border-radius:5px;border-radius:5px}.contact-form-name,.contact-form-email{height:35px}.contact-form-email-message{height:100px}.contact-form-button-submit,.contact-form-button-submit:hover{margin-top:25px;width:100%;height:37px;font:normal 12px Arial;outline:none;letter-spacing:1px;color:#fff;text-align:center;cursor:pointer;text-shadow:1px 1px 0 #ffe8b2;color:#7c5d1b;border:1px solid #d6a437;background:#febd4b;background:-webkit-gradient(linear,0 0,0 100%,from(#fed970) to(#febd4b));background:-webkit-linear-gradient(#fed970,#febd4b);background:-moz-linear-gradient(#fed970,#febd4b);background:-ms-linear-gradient(#fed970,#febd4b);background:-o-linear-gradient(#fed970,#febd4b);background:linear-gradient(#fed970,#febd4b);-pie-background:linear-gradient(#fed970,#febd4b)}.contact-form-button-submit:active{color:#7c5d1b;border:1px solid #d6a437;background:#febd4b;background:-webkit-gradient(linear,0 0,0 100%,from(#febd4b) to(#fed970));background:-webkit-linear-gradient(#febd4b,#fed970);background:-moz-linear-gradient(#febd4b,#fed970);background:-ms-linear-gradient(#febd4b,#fed970);background:-o-linear-gradient(#febd4b,#fed970);background:linear-gradient(#febd4b,#fed970);-pie-background:linear-gradient(#febd4b,#fed970)}.contact-form-cross{border:medium none!important;box-shadow:none!important;padding:0!important;height:11px !important;width:11px !important;}
</style>
<div class="widget ContactForm" id="ContactForm22"><div class="contact-form-widget"><h2 class="ribbon"><strong class="ribbon-content">Shoot Me an Email</strong></h2><div class="form"><form name="contact-form"><div class="contactf-name">Your name:<input class="contact-form-name" id="ContactForm1_contact-form-name" name="Name" size="30" type="text" value="Name" onblur='if (this.value == "") {this.value = "Name";}' onfocus='if (this.value == "Name") {this.value = "";}'  /></div><div class="contactf-email">E-mail address *:<input class="contact-form-email" id="ContactForm1_contact-form-email" name="E-mail address" size="30" type="text" value="E-mail address" onblur='if (this.value == "") {this.value = "E-mail address";}' onfocus='if (this.value == "E-mail address") {this.value = "";}'/></div><div style="clear:both"></div><div class="contactf-message">Message *:<textarea class="contact-form-email-message" cols="25" id="ContactForm1_contact-form-email-message" name="Type your message here..." rows="5" value="" placeholder="Type your message here..." value="Type your message here..." onblur='if (this.value == "") {this.value = "Type your message here...";}' onfocus='if (this.value == "Type your message here...") {this.value = "";}'></textarea><input class="contact-form-button contact-form-button-submit" id="ContactForm1_contact-form-submit" type="button" value="SEND MESSAGE" /><div class="contact-form-error-message" id="ContactForm1_contact-form-error-message"></div><div class="contact-form-success-message" id="ContactForm1_contact-form-success-message"></div></div></form></div></div></div>

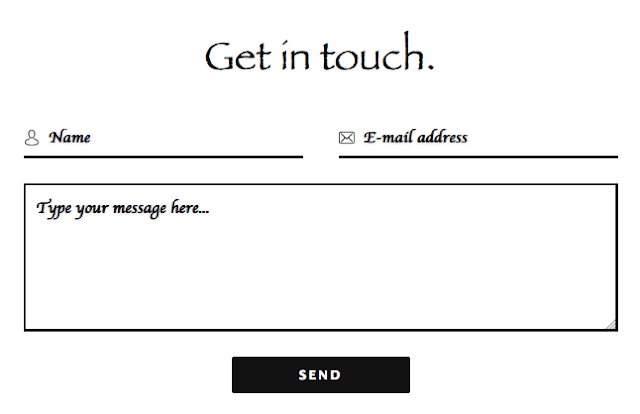
Minimal Contact Form

minimal contact form for Blogger

<style type="text/css">
.contact-form-widget{margin-left:auto;margin-right:auto;width:600px;max-width:100%;padding:25px;background:#fff}.contact-title{text-align:center;font:41px fantasy;color:#121212;margin-bottom:25px}.contactf-name,.contactf-email{float:left;width:47%}.contactf-name{margin-right:6%}.name-icon img,.email-icon img{background:transparent!important;border:medium none!important;box-shadow:none!important;padding:11px 0!important;width:16px !important;height:16px !important;}.name-icon,.email-icon{position:absolute;z-index:1}.contact-form-name,.contact-form-email,.contact-form-email-message,.contact-form-name:hover,.contact-form-name:focus,.contact-form-email:hover,.contact-form-email:focus,.contact-form-email-message:hover,.contact-form-email-message:focus{width:100%;max-width:100%;margin:0 0 25px;padding:10px 10px 10px 25px;font:bold 16px cursive;text-shadow:0 1px 2px #ddd;color:#121212;background:transparent!important;border-color:#121212;border-width:0 0 2.5px;-webkit-box-shadow:none;-moz-box-shadow:none;box-shadow:none}.contact-form-name,.contact-form-email{height:40px}.contact-form-email-message,.contact-form-email-message:hover,.contact-form-email-message:focus{padding:10px!important}.contact-form-email-message{height:150px;border-width:2.5px!important}.contact-form-button-submit,.contact-form-button-submit:hover{background:#121212!important;width:30%;height:37px;font:bold 13px "Lucida Grande";letter-spacing:2px;color:#fff;text-align:center;border:medium none;cursor:pointer;display:block;margin:0 auto;outline:none}.contact-form-cross{border:medium none!important;box-shadow:none!important;padding:0!important;width:11px !important;height:11px !important;}
</style>
<div class="widget ContactForm" id="ContactForm22"><div class="contact-form-widget"><h2 class="contact-title">Get in touch.</h2><div class="form"><form name="contact-form"><div class="contactf-name"><div class="name-icon"><img src="https://blogger.googleusercontent.com/img/b/R29vZ2xl/AVvXsEgh_1-gRnoM_NPYWLOCX6tMpPrqCWSyum25AnCR4YHPyvBQn-qRtr-7ScQT6j6l5A21720toYJqnRDEzb6SZaNHO-T3fgZx9eQv4upBNYkA8dckjMX0YfhRiHbowO7b79jOoVEJVpmw0haB/s1600/avatar%25281%2529.png" width="16" height="16" /></div><input class="contact-form-name" id="ContactForm1_contact-form-name" name="Name" size="30" type="text" value="Name" onblur='if (this.value == "") {this.value = "Name";}' onfocus='if (this.value == "Name") {this.value = "";}'  /></div><div class="contactf-email"><div class="email-icon"><img src="https://blogger.googleusercontent.com/img/b/R29vZ2xl/AVvXsEhBI6eoisUDrDigBpV8ho1K32PQDnkWkXIxxFiy_TTCTz9mEpEq87Xa-uFA2YGgsQh6fVbGA5imunqZHk5Oc-lhB1OdI5gFqaMiS6zxbR0aCa820RT7Up54Yb9QBUR2U0QGl43aweNlYDnw/s1600/envelope%25281%2529.png" width="16" height="16" /></div><input class="contact-form-email" id="ContactForm1_contact-form-email" name="E-mail address" size="30" type="text" value="E-mail address" onblur='if (this.value == "") {this.value = "E-mail address";}' onfocus='if (this.value == "E-mail address") {this.value = "";}'/></div><div style="clear:both"></div><div class="contactf-message"><textarea class="contact-form-email-message" cols="25" id="ContactForm1_contact-form-email-message" name="Type your message here..." rows="5" value="Type your message here..." onblur='if (this.value == "") {this.value = "Type your message here...";}' onfocus='if (this.value == "Type your message here...") {this.value = "";}'></textarea><input class="contact-form-button contact-form-button-submit" id="ContactForm1_contact-form-submit" type="button" value="SEND" /><div class="contact-form-error-message" id="ContactForm1_contact-form-error-message"></div><div class="contact-form-success-message" id="ContactForm1_contact-form-success-message"></div></div></form></div></div></div>

Contact form with speech bubble


<style type="text/css">
.contact-form-widget{margin-left:auto;margin-right:auto;width:600px;max-width:100%}.contactf-name,.contactf-email{float:left;width:50%}.contact-form-name,.contact-form-email,.contact-form-email-message,.contact-form-name:hover,.contact-form-name:focus,.contact-form-email:hover,.contact-form-email:focus,.contact-form-email-message:hover,.contact-form-email-message:focus{width:100%;max-width:100%;margin:0 0 15px;padding:10px;font-size:14px;color:#777;background:#E2DEDB;border:1px solid #CBC7C4;-webkit-box-shadow:none;-moz-box-shadow:none;box-shadow:none;-webkit-border-radius:20px;-moz-border-radius:20px;border-radius:20px}.contact-form-name,.contact-form-email{height:33px}.contact-form-email-message{height:130px}.contactf-message{position:relative}.contactf-message:after,.contactf-message:before{border-bottom:50px solid transparent;border-left:80px solid #E2DEDB;bottom:-32px;content:'';position:absolute;right:50%;margin-right:-100px}.contactf-message:before{border-left:80px solid #CBC7C4;bottom:-34px;right:50.3%;margin-right:-101px}.cbluebutton{margin-top:25px;width:30%;height:35px;float:right;font-size:15px;color:#fff;display:inline-block;text-align:center;background:linear-gradient(to bottom,#339ad9 0%,#224bbc 100%);box-shadow:0 1px 1px rgba(34,75,188,0.5);border:0;-webkit-border-radius:20px;-moz-border-radius:20px;border-radius:20px}.cbluebutton span .contact-form-button-submit{background:linear-gradient(to bottom,#52b1e2 0%,#397fd0 100%);font:bold 16px "Helvetica Neue",sans-serif;height:35px;width:100%;color:#FFF;text-shadow:0 1px 1px #224BBC;display:inline-block;box-shadow:0 1px 1px rgba(255,255,255,0.3) inset;cursor:pointer;outline:none;-webkit-border-radius:20px;-moz-border-radius:20px;border-radius:20px}.contact-form-button-submit:active{top:1px;outline:none;-webkit-box-shadow:none;box-shadow:none}.contact-form-cross{border:medium none!important;box-shadow:none!important;padding:0!important;width:11px !important;height:11px !important;}
</style>
<div class="widget ContactForm" id="ContactForm22"><div class="contact-form-widget"><div class="form"><form name="contact-form"><div class="contactf-message"><textarea class="contact-form-email-message" cols="25" id="ContactForm1_contact-form-email-message" name="Message" rows="5" value="Message" onblur='if (this.value == "") {this.value = "Message";}' onfocus='if (this.value == "Message") {this.value = "";}'></textarea></div><div class="cbluebutton"><span><input class="contact-form-button contact-form-button-submit" id="ContactForm1_contact-form-submit" type="button" value="Send" /></span></div><div class="contactf-name"><input class="contact-form-name" id="ContactForm1_contact-form-name" name="name" size="30" type="text" value="Name" onblur='if (this.value == "") {this.value = "Name";}' onfocus='if (this.value == "Name") {this.value = "";}'  /></div><div class="contactf-email"><input class="contact-form-email" id="ContactForm1_contact-form-email" name="email" size="30" type="text" value="E-mail" onblur='if (this.value == "") {this.value = "E-mail";}' onfocus='if (this.value == "E-mail") {this.value = "";}'/></div><div style="clear:both"></div><div class="contact-form-error-message" id="ContactForm1_contact-form-error-message"></div><div class="contact-form-success-message" id="ContactForm1_contact-form-success-message"></div></div></form></div></div>

5. After you added the code, click the "Publish" button on the upper right side. Now you should be able to see the Blogger contact form live on your static page. To ensure that everything works fine, you can send a message as a test. The message should be delivered to your inbox in a matter of seconds, just make sure that you're checking the email that you're using with your Blogger account.

Frequently Asked Questions about the Custom Contact Form for Blogger

Where do the messages go?

Once a visitor asks a question or sends feedback through the Blogger contact form, it is instantly delivered to the email associated with your Blogger account. If a blog has several administrators, then all the individual administrators will receive the comments or questions asked by the visitor.

What is the benefit of using a separate "Contact Us" page?

Even though it all comes down to your personal preferences, your blog will look more professional if it has a separate page for the custom contact form for Blogger. It gives you credibility and also offers you the chance to add a specific call to action in the new "Contact Us" page.

Is it possible to add extra fields?

Unfortunately, no. You can't add custom fields such as website, phone number or mailing address since Blogger uses special tags in order to transfer data. In any case, the default fields are well laid-out and will help you to get the basic information you need about your visitors.

I have installed the Blogger contact form, but it is not working. What could be the problem?

There are several reasons why you may be having trouble setting up your contact form. The simplest way to troubleshoot is to countercheck the email you linked to the blog and also reinstall the form again.

Ultimately, by using the custom Blogger contact form you gain from consistency in the type of information you request and also reduce spam since you will not have to display your email directly on the blog.