Customizable Related Posts Widget for Blogger
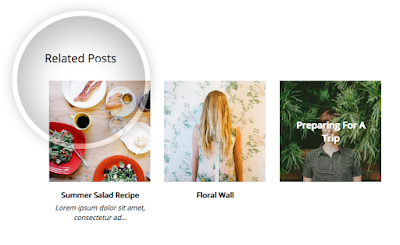
blogger posts javascript posts related postsWe already posted a few tutorials on how to add related posts widget with thumbnails in Blogger with summaries or only titles, which can be compiled into a single All-In-One Widget with powerful options. This new customizable related posts widget for Blogger integrates all the features we've seen before and more, such as thumbnails (square or round), post dates, excerpts, display only titles / thumbnails.
Now let's see what this related posts blogger widget has to offer.

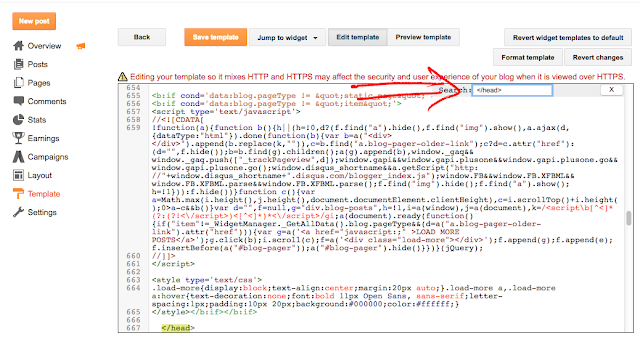
Next, we're going to use the template search feature, be sure to follow these directions exactly:
1. Place your cursor on the template code.
2. Click once.
3. Press CTRL and F at the same time (PC) or Command and F (Mac).
The search box will open in the upper right corner of the template editor.

Type </head> in the search box, then press ENTER. This will take you to the </head> tag in your template and highlight it in yellow.
Select and copy the entire CSS style below and paste it directly ABOVE the </head> tag:
Next, we need to add the script - search for the following line:
Once you found it, click the small arrow not beside it but with one level above to expand code and scroll down until you see </b:includable> - right below this tag, you should see the line including the "postQuickEdit" id.
See the screenshot for more help:

Just ABOVE the </b:includable> tag, add the following script:
To change the number of posts to display, change the '4' value from this line:
Note: you may need to change the percentages in the CSS styles above in order to make posts fit the related container. Just follow the values in red and play with them until you get the best results.
To change the style of the related posts widget, modify the '4' value from:
If you want thumbnails have rounded corners, change 'false' with 'true':
To reduce or add more characters to the snippets, change the "45" value:
If you want to center text (title and summary), change 'false' to 'true':
To open links in a new tab when visitors click on a related post, change "false" to "true":
Once you're done with the settings, click the 'Save Template' button and now you can see the related posts widget live on your Blogger blog.
Now let's see what this related posts blogger widget has to offer.

Related Posts Widget Features:
- 9 attractive styles to match your needs
- Show Title, excerpt & thumbnails
- Display simple related posts with titles / summaries / post date
- Choose whether to display the post thumbnails or not
- Ability to control the thumbnail image size
- Option to choose square or round thumbnails
- Show post text excerpts
- Control the length of the post excerpt / title
- Determine the number of related posts to display
Requirements:
- The related posts widget recognizes post thumbnails uploaded through Blogger itself (or Picasa Web Albums), other images from Photobucket, Flickr, or other non-Blogger hosts will not be supported.
- This widget is compatible with the standard desktop Blogger templates except Dynamic Views, which does not accept customization.
- The script does not work on private blogs, so your blog / site must be open to the public in order to show.
Adding Customizable Related Posts Widget in Blogger
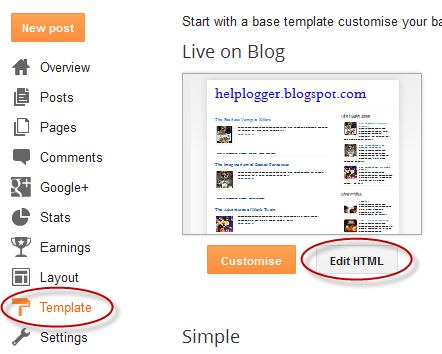
Log into your Blogger dashboard, go to 'Template' and open template editor by clicking the 'Edit HTML' button below 'Live On Blog' preview.Next, we're going to use the template search feature, be sure to follow these directions exactly:
1. Place your cursor on the template code.
2. Click once.
3. Press CTRL and F at the same time (PC) or Command and F (Mac).
The search box will open in the upper right corner of the template editor.

Type </head> in the search box, then press ENTER. This will take you to the </head> tag in your template and highlight it in yellow.
Select and copy the entire CSS style below and paste it directly ABOVE the </head> tag:
<style type='text/css'>
.related-posts-container{margin:55px 0px;}.related-posts-container h4{font:20px 'Open Sans', sans-serif;margin-bottom:20px;}.related-posts-container ul,.related-posts-container ul li{list-style: none;margin: 0;padding: 0;}.related-posts-container ul li a{text-transform:capitalize !important;font:bold 13px 'Open Sans', sans-serif;outline: 0;}.related-snippets{margin-top:5px;font:italic 12px 'Open Sans', sans-serif;}.related-posts-1 li{list-style:inside none disc !important;}.related-posts-1 li,.related-posts-2 li{border-top:1px solid rgba(0,0,0,0.04);padding:0.8em 0 !important;}.related-posts-1 li:first-child,.related-posts-2 li:first-child{border-top:medium none;}li.related-post-item{margin:0 3% 3% 0 !important;width:22.7%;float:left;list-style:none;position:relative;}li.related-post-item:last-child{margin:0 0 2% !important;}.related-thumb-large{width:100%;height:auto;border:none;margin:0px auto 10px;padding:0 !important;}.related-posts-8 li .related-title,.related-posts-9 li .related-title,.related-posts-9 li .related-snippets{padding-left:74px;}.related-posts-8 li:nth-child(even),.related-posts-9 li:nth-child(even){margin:0 0 4% !important;}.related-posts-8 li,.related-posts-9 li{background-color:#ffffff;box-shadow:0 0 4px rgba(180, 180, 180, 0.55);width:42% !important;float:left;margin:0 4% 4% 0 !important;padding:3% !important;}.related-thumb{float:left;height:64px;margin-right:10px;object-fit:cover;width:64px;}.related-posts-6 li,.related-posts-6 a{line-height:0 !important;}.related-posts-6 .related-thumb-large{margin-bottom:0;}.related-posts-7 li.related-post-item{margin:0 !important;width:25% !important;}.related-wrapper{position:absolute;left:0px;right:0;top:0px;bottom:0;margin:0 auto;z-index:4;background:rgba(77,77,77,0.2);}.related-wrapper-inner{position:relative;height:100%;z-index:99;width:100%;display:table;vertical-align:middle;text-align:center;-moz-box-sizing:border-box;-webkit-box-sizing:border-box;box-sizing:border-box;}.related-wrapper .related-title{vertical-align:middle;display:table-cell;color:#ffffff;font:bold 16px 'Open Sans', sans-serif;padding:0 20px;}.related-date{margin-top:5px;font:italic 11px 'Open Sans', sans-serif;color:#999999;}
</style>
Next, we need to add the script - search for the following line:
<b:includable id='postQuickEdit' var='post'>
Once you found it, click the small arrow not beside it but with one level above to expand code and scroll down until you see </b:includable> - right below this tag, you should see the line including the "postQuickEdit" id.
See the screenshot for more help:

Just ABOVE the </b:includable> tag, add the following script:
<b:if cond='data:blog.pageType == "item"'>
<div class='related-posts-container' id='related-posts-widget'/>
<div style='clear: both;'/>
<script type='text/javascript'>
var labelArray = [<b:if cond='data:post.labels'><b:loop values='data:post.labels' var='label'>"<data:label.name/>"<b:if cond='data:label.isLast != "true"'>,</b:if></b:loop></b:if>];
var relatedSettings = {
blogURL:"<data:blog.homepageUrl/>",
relatedHeading:"<h4><span>Related Posts</span></h4>",
relatedPosts:4,
relatedStyle:4,
thumbnailSize:"w300-h200-p-nu",
defaultThumb:"https://blogger.googleusercontent.com/img/b/R29vZ2xl/AVvXsEjDYphQtNKeMmZooToNMgUY7XpNF7ZMkG4miPDgXDUMajcUOhf94ZQlBkDoB0FEpRr_HBO5KfDdavKV3VXOYXeC-J8oj3tnQ-Ssi95dzLWAEXrSgb7MdEN7zlGBfmYvhmkgtRkMu-WPL1JQ/300-h200-c/no-thumb.png",
roundThumbs:false,
titleLength:"auto",
snippetLength:45,
centerText:false,
openNewTab:false
};</script>
<script type='text/javascript'>
//<![CDATA[
var randomRelatedIndex,startRelated;!function(a,b,c){var d={callBack:function(){}};for(var e in relatedSettings)d[e]="undefined"==relatedSettings[e]?d[e]:relatedSettings[e];var f=function(a){var d=b.createElement("script");d.type="text/javascript",d.src=a,c.appendChild(d)},g=function(a,b){return Math.floor(Math.random()*(b-a+1))+a},h=function(a){var c,d,b=a.length;if(0===b)return!1;for(;--b;)c=Math.floor(Math.random()*(b+1)),d=a[b],a[b]=a[c],a[c]=d;return a},i="object"==typeof labelArray&&labelArray.length>0?"/-/"+h(labelArray)[0]:"",j=function(a){var b=a.feed.openSearch$totalResults.$t-d.relatedPosts,c=g(1,b>0?b:1);f(d.blogURL.replace(/\/$/,"")+"/feeds/posts/summary"+i+"?alt=json-in-script&orderby=updated&start-index="+c+"&max-results="+d.relatedPosts+"&callback=startRelated")},k=function(a){var l,m,n,o,p,q,b=document.getElementById("related-posts-widget"),c=h(a.feed.entry),e=d.relatedStyle,f=d.relatedHeading+'<ul class="related-posts-'+e+'">',g=d.openNewTab?' target="_blank"':"",i=d.centerText?"text-align:center;":"",j=d.roundThumbs?"-webkit-border-radius:50%;-moz-border-radius:50%;border-radius:50%;":"",k='<span style="display:block;clear:both;"></span>';if(b){for(var r=0;r<d.relatedPosts&&r!=c.length;r++){n=c[r].title.$t,o="auto"!==d.titleLength&&d.titleLength<n.length?n.substring(0,d.titleLength)+"…":n,p="media$thumbnail"in c[r]&&d.thumbnailSize!==!1?c[r].media$thumbnail.url.replace(/\/s[0-9]+(\-c)?/,"/"+d.thumbnailSize):d.defaultThumb,l=h(c[r].published.$t);for(var s=[1,2,3,4,5,6,7,8,9,10,11,12],t=["January","February","March","April","May","June","July","August","September","October","November","December"],u=l.split("-")[2].substring(0,2),v=l.split("-")[1],w=l.split("-")[0],x=0;x<s.length;x++)if(parseInt(v)==s[x]){v=t[x];break}postdate=v+" "+u+" "+w,q="summary"in c[r]&&d.snippetLength>0?c[r].summary.$t.replace(/<br ?\/?>/g," ").replace(/<.*?>/g,"").replace(/[<>]/g,"").substring(0,d.snippetLength)+"…":"";for(var y=0,z=c[r].link.length;y<z;y++)m="alternate"==c[r].link[y].rel?c[r].link[y].href:"#";1==e?f+='<li><a href="'+m+'" '+g+">"+o+"</a></li>":2==e?f+='<li><a href="'+m+'" '+g+'><div class="related-title">'+o+'</div></a><div class="related-snippets">'+q+"</div></li>":3==e?f+='<li class="related-post-item" style="'+i+'"><a href="'+m+'" '+g+'><img alt="" class="related-thumb-large" src="'+p+'" style="'+j+'"><div class="related-title">'+o+'</div></a><div class="related-snippets">'+q+"</div></li>":4==e?f+='<li class="related-post-item" style="'+i+'"><a href="'+m+'" '+g+'><img alt="" class="related-thumb-large" src="'+p+'" style="'+j+'"><div class="related-title">'+o+'</div></a><div class="related-date">'+postdate+"</div></li>":5==e?f+='<li class="related-post-item" style="'+i+'"><a href="'+m+'" '+g+'><img alt="" class="related-thumb-large" src="'+p+'" style="'+j+'"><div class="related-title">'+o+"</div></a></li>":6==e?f+='<li class="related-post-item"><a href="'+m+'" '+g+'><img alt="" class="related-thumb-large" src="'+p+'" style="'+j+'"><div class="related-wrapper" style="'+j+'"><div class="related-wrapper-inner"><div class="related-title">'+o+"</div></div></div></a></li>":7==e?f+='<li class="related-post-item"><a href="'+m+'" '+g+'><img alt="" class="related-thumb-large" src="'+p+'" style="'+j+'"></a></li>':8==e?f+='<li class="related-post-item"><a class="related-post-item-wrapper" href="'+m+'" '+g+'><img alt="" class="related-thumb" src="'+p+'" style="'+j+'"><div class="related-title">'+o+'</div></a><div class="related-date">'+postdate+"</div></li>":9==e&&(f+='<li><a href="'+m+'" '+g+'><img alt="" class="related-thumb" src="'+p+'" style="'+j+'"><div class="related-title">'+o+'</div></a><div class="related-snippets">'+q+"</div></li>")}b.innerHTML=f+="</ul>"+k,d.callBack()}};randomRelatedIndex=j,startRelated=k,f(d.blogURL.replace(/\/$/,"")+"/feeds/posts/summary"+i+"?alt=json-in-script&orderby=updated&max-results=0&callback=randomRelatedIndex")}(window,document,document.getElementsByTagName("head")[0]);
//]]>
</script>
</b:if>
How to Customize the Related Posts Widget for Blogger?
To change the 'Related Posts' text that appears above the widget, modify the text in red:relatedHeading: "<h4><span>Related Posts</span></h4>",
To change the number of posts to display, change the '4' value from this line:
relatedPosts: 4,
Note: you may need to change the percentages in the CSS styles above in order to make posts fit the related container. Just follow the values in red and play with them until you get the best results.
To change the style of the related posts widget, modify the '4' value from:
relatedStyle: 4,
Available Related Posts Styles
- simple related posts widget that will show post titles only
- display post titles and snippets
- display post thumbnails, titles and snippets
- display related posts thumbnails, titles and post date (shows by default)
- display related posts thumbnails and titles
- post titles in front of thumbnails, instead of having them below the thumbnail
- display thumbnails only
- small thumbnail with titles on the right and date below
- small thumbnails with post titles and excerpts on the right
Customizing the Related Post Thumbnail Size & Style
By default, thumbnails are resized and cropped automatically to be 300px wide by 200px tall. If you want to change the width and height of the thumbnails, modify the '300' and '200' values from:thumbnailSize: "w300-h200-p-nu",Note: 'w' comes from width, 'h' comes from height. To make the thumbnails square, change the 'h' (height) value and make it equal with 'w' (width) value. A higher value will result in more high-res images.
defaultThumb: "https://blogger.googleusercontent.com/img/b/R29vZ2xl/AVvXsEjDYphQtNKeMmZooToNMgUY7XpNF7ZMkG4miPDgXDUMajcUOhf94ZQlBkDoB0FEpRr_HBO5KfDdavKV3VXOYXeC-J8oj3tnQ-Ssi95dzLWAEXrSgb7MdEN7zlGBfmYvhmkgtRkMu-WPL1JQ/300-h200-c/no-thumb.png",
If you want thumbnails have rounded corners, change 'false' with 'true':
roundThumbs:false,
Customizing Related Titles & Excerpts
To shorten the post title, change auto with the number of characters to show:titleLength: "auto",
To reduce or add more characters to the snippets, change the "45" value:
snippetLength: 45,
If you want to center text (title and summary), change 'false' to 'true':
centerText:false,
To open links in a new tab when visitors click on a related post, change "false" to "true":
openNewTab: false
Once you're done with the settings, click the 'Save Template' button and now you can see the related posts widget live on your Blogger blog.


