How To Add a Floating Sticky Footer Bar in Blogger

 Posted by
 Title : How To Add a Floating Sticky Footer Bar in Blogger
link : How To Add a Floating Sticky Footer Bar in Blogger
How To Add a Floating Sticky Footer Bar in Blogger
I have seen that many of those using toolbars such as Wibiya have had to remove it because of interfering with the performance of some scripts like Scriptaculous and Prototype, while others have chosen to remove these scripts just to continue using the toolbar.Well, for those who prefer to have a custom toolbar that does not give them such problems and allow them to continue using other scripts, here's how to create our own floating toolbar with a close option.
The toolbar contains a search box, link for feed subscription, link to follow on Twitter and Facebook, like button to share on Twitter or Facebook and translator in five languages.

You can see it working in this demo blog.
Adding a Custom Sticky Toolbar on Blogger
Step 1. Login to your Blogger account > select your blog > click on the "Template" option on the left side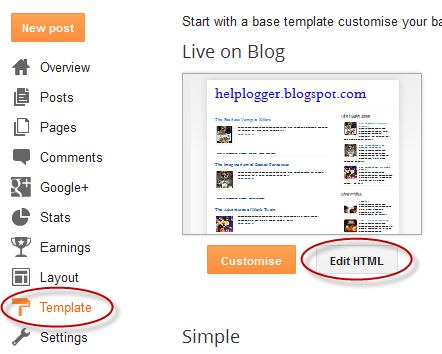
Step 2. Click on the Edit HTML button on the right side > click anywhere inside the code area and press CTRL + F keys to open the Blogger search box
Step 3. Paste or type the following tag inside the search box and hit Enter to find it:
]]></b:skin>Step 4. Just above ]]></b:skin> add the following CSS style:
#custom-toolbar {Step 5. Now search for this tag:
overflow: auto;
position: fixed;
background: #1B1B1B url("https://blogger.googleusercontent.com/img/b/R29vZ2xl/AVvXsEi6hFZCz89g83mBhUfl0TeXgq6HZ_RuzCKLx4d6PLgRZ8iFj0sW7uJLfHUkyEl6uZ9bF93Kb-1x_3xbJ2qzAQAekVoVrnRjZidPAp9TYPDMncNbEHpyxAgCqgG80e3IqetLbkBYwddbDG7V/s1600/pagelist.png") repeat-x scroll 0 bottom;
font: bold 13px/17px "Helvetica Neue",Helvetica,Arial,Geneva,sans-serif;
height: 33px;
margin: 0 auto;
width: 100%;
bottom:0px;
right:0;
}
.close-toolbar {
float: right;
margin-top:6px;
padding-right: 10px;
cursor: pointer;
}
.search-text {
color: #D1D1D1;
text-align: center;
border-radius: 10px;
}
.google_translate:hover img {
filter:alpha(opacity=0.90);
-moz-opacity: 0.90;
opacity: 0.90;
border:0;
}
</head>Step 6. Just above the </head> tag add this script:
<script type='text/javascript'>Step 7. Now search for the </body> tag and just above it, add this HTML code:
// Custom Toolbar for Blogger (helplogger.blogspot.com)
//<![CDATA[
var toolbar_blogger = new Array();
var toolbar_clear = new Array();
function toolbarFloat(toolb) {
toolbar_blogger[toolbar_blogger.length] = this;
var ftrpointer = eval(toolbar_blogger.length-1);
this.pagetop = 0;
this.cmode = (document.compatMode && document.compatMode!="BackCompat") ? document.documentElement : document.body;
this.toolbsrc = document.all? document.all[toolb] : document.getElementById(toolb);
this.toolbsrc.height = this.toolbsrc.offsetHeight;
this.toolbheight = this.cmode.clientHeight;
this.toolboffset = toolbGetOffsetY(toolbar_blogger[toolbpointer]);
var toolbbar = 'toolbar_clear['+toolbpointer+'] = setInterval("toolbarFloatInit(toolbar_blogger['+toolbpointer+'])",1);';
toolbbar = toolbbar;
eval(toolbbar);
}
function toolbGetOffsetY(toolb) {
var toolbTotOffset = parseInt(toolb.mtasrc.offsetTop);
var parentOffset = toolb.toolbsrc.offsetParent;
while ( parentOffset != null ) {
toolbTotOffset += parentOffset.offsetTop;
parentOffset = parentOffset.offsetParent;
}
return toolbTotOffset;
}
function toolbarFloatInit(toolb) {
toolb.pagetop = toolb.cmode.scrollTop;
toolb.toolbsrc.style.top = toolb.pagetop - toolb.mtaoffset + "px";
}
function closeTopAds() {
document.getElementById("custom-toolbar").style.visibility = "hidden";
}
//]]>
</script>
<div id='custom-toolbar'>Finally, change what is in blue with the URLs of your Facebook and Twitter profiles.
<img border='0' class='close-toolbar' onClick='closeTopAds();return false;' src='https://blogger.googleusercontent.com/img/b/R29vZ2xl/AVvXsEjW22tAdP-VnnGyiGSVqeKimXmOt0cAyNsLga_WVlVMgNBpJfi0LZcIEbYAE7PvKq0iR8k251bjl9rT7aX9TIpwP_5rMa1VJnQe3vyDVBKBFb3eLK63wsEaL-mNMeRdicdiytYamAJKPiMP/s1600/close_button.png' title='Close' width='17'/>
<table border='0' cellpadding='2'>
<tr>
<td style='padding-left:30px; padding-right:50px;'><form action='/search' id='search' method='get' name='searchForm' style='display:inline;'>
<input class='search-text' name='q' onblur='if (this.value == "") this.value = "Search here...";' onfocus='if (this.value == "Search here...") this.value = "";' size='28' type='text' value='Search here...'/></form></td>
<td style='padding-left:20px;'><a href='http://www.facebook.com/username' title='Follow on Facebook'><img src='https://blogger.googleusercontent.com/img/b/R29vZ2xl/AVvXsEjNQiiyw_Awj3YP9mG9zvV6CxuXPi9WQuoIeaf3rXjBi6WVLzCWakotO6zr2kN1R3WnnByuIhyY2fT84U_Js8zRRKMLnR4E2l37sI9-NOiZjTg8X1fYvh4YGPnVlmJ_zC5s18CGymGEq1XD/s1600/facebook-icon.png'/></a></td>
<td><a href='http://twitter.com/username' title='Follow on Twitter'><img src='https://blogger.googleusercontent.com/img/b/R29vZ2xl/AVvXsEjKO1WEr7MJPqeMKKjK3iTlNl5-DWdJLfn8-EgvvqA6cdKXHwbdEDleN1uc7M8p6BuGf6OV2hOrcmatG-lvYchMACn_WagsD_eJlx6nY5wai2SUZNvI3TiCfFs-d5FhAJUaaks7s2xzC9Vc/s1600/twitter-icon.png'/></a></td>
<td><a expr:href='data:blog.homepageUrl + "feeds/posts/default"' title='Subscribe to Feed'><img src='https://blogger.googleusercontent.com/img/b/R29vZ2xl/AVvXsEixPs63WTTyCyJrKG6Fw7lIbZl8A1VZYbCWOAz6cdIc0_WdYO3cxGT346bhonpaKocuPbblIC0smjX9JibG9oFp8VSoUYKR-ONUel-e-AbMfG9s49j5O9d4jpdAX34hfMq12EafHuRStOg4/s1600/rss-feed-icon2.png'/></a></td>
<td style='padding-left:40px; padding-top: 5px;'><a class='twitter-share-button' data-count='horizontal' data-lang='en' href='http://twitter.com/share' title='Publish on Twitter'>Tweet</a><script src='http://platform.twitter.com/widgets.js' type='text/javascript'/></td>
<td><a href='http://www.facebook.com/sharer.php' name='fb_share' title='Publish on Facebook' type='button_count'>Share</a><script src='http://static.ak.fbcdn.net/connect.php/js/FB.Share' type='text/javascript'/></td>
<td style='padding-left:60px;'><a class="google_translate" href='Javascript:void(0)' onclick='window.open("http://www.google.com/translate?u="+encodeURIComponent(location.href)+"&langpair=auto%7Cen&hl=en&ie=UTF8"); return false;' rel='nofollow' title='English'><img align='absbottom' alt='English' border='0' height='24' src='https://blogger.googleusercontent.com/img/b/R29vZ2xl/AVvXsEgLROVbPbMlsJcl2v6qMk2lpisQ8eZDTYxWoIPYabVnK3moYTzKilrfeoLa9dRNRq2vcjuHixOyWTBvnAAG_Li2PNDm3t28DiF14jckLuT9xqYnJvOYSdzvkJq9ENghV2xxJGReyhcMEySI/s1600/United+Kingdom(Great+Britain).png' width='24'/></a></td>
<td><a class="google_translate" href='Javascript:void(0)' onclick="window.open("http://www.google.com/translate?u="+encodeURIComponent(location.href)+"&langpair=auto%7Cde&hl=en&ie=UTF8"); return false;"><img alt="German" border="0" align="absbottom" title="German" height="24" src="https://blogger.googleusercontent.com/img/b/R29vZ2xl/AVvXsEiptH59u03lBQTHxVymJIRtp3NMaj-BmhsGoglpCqLfNgyI4CG3tZYIb1UDaXBqUVrdftuGU6EmfWJ9eSD-1oNa3UvhpnFbvJ5CFHpL5EQd5TIEMgmfSaF3jda5vWuNk_1sTqSJaIUF_Czw/s1600/Germany.png" width="24"/></a></td>
<td><a class="google_translate" href='Javascript:void(0)' onclick='window.open("http://www.google.com/translate?u="+encodeURIComponent(location.href)+"&langpair=auto%7Cfr&hl=en&ie=UTF8"); return false;' rel='nofollow' title='French'><img align='absbottom' alt='French' border='0' height='24' src='https://blogger.googleusercontent.com/img/b/R29vZ2xl/AVvXsEg5b5xxfWrwRv1Y24S4MlLMtpRy1b9wP9HIunw6a3LR_gbJ8I15qvGB-Zp0uqiX_RZJhCEbShswsMA4HOgGmcLx-p0hSkv0faeNfzUJ4nEXrQ1tHG6Br_io_jVOBVJ8wbrfcJuS91Xlfggp/s1600/France.png' width='24'/></a></td>
<td><a class="google_translate" href='Javascript:void(0)' onclick='window.open("http://www.google.com/translate?u="+encodeURIComponent(location.href)+"&langpair=auto%7Car&hl=en&ie=UTF8"); return false;' rel='nofollow' title='Arabic'><img align='absbottom' alt='Arabic' border='0' height='24' src='https://blogger.googleusercontent.com/img/b/R29vZ2xl/AVvXsEgdFBWN98aOBsyjoOzgrIfBMTx1K4KSNpHopjUWlPr667BKDt2CHtDWPY9bAiIinQPzKCxzH-_rL1utBlnh4O7LLPy_uUf2Hujwf5V4BdXajMshYalKIS5AzZW-AeYDnRlu0IsNbqEoLClc/s1600/Saudi+Arabia.png' width='24'/></a></td>
<td><a class="google_translate" href='Javascript:void(0)' onclick='window.open("http://www.google.com/translate?u="+encodeURIComponent(location.href)+"&langpair=auto%7Czh-cn&hl=en&ie=UTF8"); return false;' rel='nofollow' title='Chinese Simplified'><img align='absbottom' alt='Chinese Simplified' border='0' height='24' src='https://blogger.googleusercontent.com/img/b/R29vZ2xl/AVvXsEhpiYVgJHwFOHTlphLJmi9l5r-TMRfYeXK4FVHwocsrFiXBmZCqkzZqxbSek13f8VNu3DClwt9FjuvNMS_SxTgZ0ghPeG-tuqYySjYfkbl5RdUTKfwz4Jr7M44G_Q_d4bW5Z9yfHzeiRZCr/s1600/China.png' width='24'/></a></td>
</tr>
</table>
</div>
If you want to add more items, such as a counter, links etc. add a line like this just before the </tr> tag:
<td>Add here the extra content</td>Add the content where is indicated and that's it.
As you can see, it is not necessary to depend on external sites to have a toolbar, from now on you can have a floating sticky toolbar on your Blogger blog.
Thus the article How To Add a Floating Sticky Footer Bar in Blogger
That's the article How To Add a Floating Sticky Footer Bar in Blogger this time, hopefully it can be of benefit to all of you. well, see you in another article post.
You are now reading the article How To Add a Floating Sticky Footer Bar in Blogger with the link address https://poccoll.blogspot.com/2014/02/how-to-add-floating-sticky-footer-bar.html

No comments: