Showing posts with label Facebook. Show all posts

Friday, March 31, 2017

How to Get Real Likes on Your Facebook Fan Page

Today, most of the people use Facebook and to show off with thier friends they use some third party tools to get likes but do you think that your account is Safe?

No, your account can be hacked very easily if you try to do something like this, just stay tuned and keep reading because today I'm going to tell you the 101% reals ways to get facebook likes on your fan page and please read this full funny article.

Facebook is leading social media but if you have no likes on your facebook page then you will not get views so, today I will teach you how to get more facebook likes.

Read this story:


Get Real Facebook Likes


Let's Read This Cool Story !!

The Story of Ram

Ram is a boy and he have a facebook account because he want to connect with people but after sometimes, to show off her friends he try to gain so many likes. Ram tagged his each of his friends to get likes but he get only 4 Likes. (ha ha)

Now, Ram get frustrated because his friends got more likes as compare to him. Ram turn on his internet and search "How to get Free Likes" on Google. As we know that Google is search engine so it shows so many result.

Ram found a website and that websites gurantees that they will gives more than 100 likes. Ram think "WOW 100 Likes"


Get Real Facebook Likes
Source - salesproinsider.com
100 Likes is too much for Ram because previously he get only 4 likes.

After that Ram Sign Up on that website with his Facebook account. 

(If You Signup on any such kind of website then they want a "KEY" ) Ram also submitted the key to that websites.

Wow, Something this happen

Ram got 140+ likes on his post in under 5 minutes. Now, Ram uses this method everytime for his each post but........ after few days he start recieving so much notfication and when he check, he found that he likes so many pages.

After deep researching on google he found that he doesn't like this page so, who ?? Yes, that website, who submitted your Keys. 

Now Ram Facebook Account is not Under his Control and lastly he deleted it.

Once again, Don't apply for this website because they will take your everythings from facebook even personal things can be approached.

The Story Of Shyam

Shyam is a website developer as he loves to developed a website. He knows everythings, one day he created a website and for the business he also create Facebook page. When he started he had "0" likes. Yes, "0" likes.

He want more likes to grow his business but he didn't got. Now he also searched "How to Get Facebook Likes" on google but he didn't submit any single previous data because he thinks that why any website gives me free likes.

He found a website in which he found "Legit ways to Get facebook likes". Now Shyam read that article in details and knows some basics concept of marketing and real ways to get likes.

He had taken some advice from expert, he researched on google and then he apply all the things on his facebook page.

Now he found his facebook page growing day by day with some simple tactics and some precaution and now he has 50,000+ real likes.

Do you want to know the tactics of Shyam then keep reading.....

The Real and Legal Ways to Get Facebook Likes

There are several legal ways to get likes on facebook and that includes promotion of your facebook page, daily schedule and too many ways. Today we are going to read it all in details but first share this post to help other people specially share it on facebook so that people knows it.


Like
Source - dozmia.com


Now let's get started.

Organize a Special Day For Your Facebook Page

Yes, create a special day on your facebook page every week, like on my facebook page I do something special on every friday and name this series as "Friday Dhamal" which keep attention of people.

Always do something intresting and tell yourself why would people like your page, it only happen if you have well organized post.

You can start a series like me or you can start a podcast, just go and think about a special day every week on your facebook account.

In a study, it was found that most of the people is active on Friday, Saturday, Sunday as compare to Monday, Tuesday and Wednesday because it was weekend and everyone enjoy the leave. These small things in your mind can increase your facebook likes.

Leave a Inspiring Thoughts

Everyday at once you can leave at least one inspiring thoughts with images. Really, one thoughts can increase your likes and make you more trusted because if you have so many likes and no one trust you then your all time get's lost.

Try to post like this as shown in images below.

Get Real Facebook Likes
Facebook.com/Tipskitricks
As you can see in the image that there is handwritten thoughts + thoughts in images + website link in images.

1- Handwriiten thoughts enable user to copy and paste that word on thier Facebook page.

2- Thoughts in images create more engagement and looks beautiful.

3- Website links in images allow user to check your website and this method can increase your websites views.

This Strategy is Called 3 in 1 Superfantastic Posts.

Try to Post Short Videos on Your Facebook Page

Now, Internet connectivity is increasing day by day and everyone have 4G phone.

Everyone love videos and if the video is short then people definately going to watch these.

Here is an example,


Get Real Facebook Likes

Now here, I've posted a video on "Internet Most Interesting Website". I just go and find super video on youtube and copy that URL and then paste it after that type your words.

Make sure you have removed the links when the video appear because it look spammy. Just enter your link and when the video appear, remove the link.

Make sure you must use the word "Don't Miss", "Must Watch", etc because this make people to click on your video and after that for more video they will surely like you page.

Promote Your Facebook Page on Facebook Groups

Facebook is one og the biggest social media network and on facebook there are many popular groups with 50,000 + member. Just go ahead and join that group.

Get More Facebook Likes

After joining post your facebook page link there are tell people to like your page. You can post like this.

Example Of Bad Post:

Just like my page at here - http://www.facebook.com/tipskitricks

Example of Good Post:

Hello, Friends 

I Want to Take Your 2 Minutes by Telling You About My Facebook Page.
My Facebook Page Name is http://www.facebook.com/Tipskitricks . I posted about Technology stuff, Gadgets review, App Review.

Also I have special day in which I would share some special things every weekends so make sure you don't Miss it.

Your Facebook Page Name

Sometimes groups admin cannot approve your post in this case, contact group admin and then talk professionally and request to post about your facebook page and this may help you.


Embed Or Link Your Facebook Page

Get facebook Likes


If you have any website with good traffic then you can embedd your facebook page so, if any visitors will see your facebook page they may hit the like button.

Today, everyone have youtube channel and if you have any popular youtube channel or youtube channel with good traffic then just put your facebook link into your video description.

Always try to build facebook community which make your business grows and support you. 

Reach Facebook Audience by Facebook Advert

Get More facebook likes
Just Reach Your Audience
While using facebook, sometimes you will see ads and some times you will see ads to like someones pages. Yes, its facebook super targeting ads service.

This is an advertising method provided by facebook to reach more audience. It will cost some money to advertise your page and it's need little bit of investment. 


You are not buying likes, you are just reaching your audience and it's upon audience that they like your page or not.

Invite All Your Friends and Your Friends Invites Thier Friends

Get More facebook Likes
facebook.com/tipskitricks
If you have lot's of facebook friends then start inviting them all. Here is an extension which allows you to invite your all facebook friends at once to like your page.

After inviting your all friends, you surely get some likes but at a certain time you didn't get likes so, in this case reach your every friends and tell them to invite thier friends in 2 minutes.

This method will works and you will gain your first 100 likes for sure.

Schedule Your Facebook Posts

By Scheduling your facebook post daily at same time allows your visitors to know when you exactly post and this cause so much views and sharing.

If you don't know how to schedule your post see the image below-

HOw to schedule facebook post
facebook.com/tipskitricks
So, I think you know "How easy it is"

Provide Special Offer to Your Facebook Fan Page

Yes, you can create special offer like some coupon code to get anythings at huge discount, you can also create custom offers as your wish.

By Creating an offer you will attract more audience and you will get more views on your facebook page. Here is the tutorial to create facebook offers.
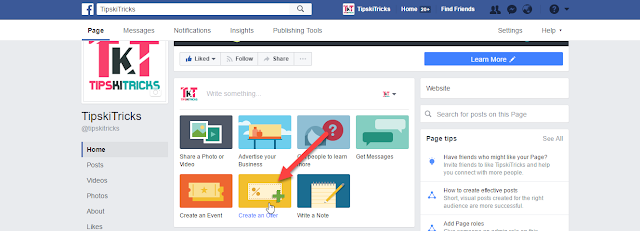
Get More Facebook Likes

First click on Create an Offer and then create your offer, if you have coupon code then enter it there.


Get Real Facebook Likes
Enter all your details about coupons or offers then choose photo and upload attractive cover type images which give more attraction.

That's sit, You have successfully created your offer and you are ready to build your audience. 

Conclusion

I just share you some information, my main mission for creating this post is keep away from fake likes just use this strategy to gain more likes. Likes will only increase if your page have great content that is what people want to see.

I'm sure that by this easy tactics you will increase your facebook visibility and likes. If your likes are not increasing then you can reach more people with facebook advertising which is made for very targeted people.

Always make sure that don't submit your any facebook data to non trusted Website. 

Please focus on your content and what are you delievering to your audience, don't post illegal things, always professional, reply your comments, live like a family.

Wow ! Completed, Now Apply All These Tactics on Your Facebook Fan Page.

What's Other People Are Reading:


Download Flipkart App

Please Subscribe My Blog For The Latest Update, You Can Follow me on Facebook and Twitter - twitter.com/tipskitricks and facebook.com/tipskitricks

You Need To Help Other People on Facebook so, Share this Post to Facebook and Help Others like You.

Tuesday, September 27, 2016

Share Blogger Post Automatically to Facebook using IFTTT

Automatically posting a blog post to Facebook used to be a challenge. The idea was simple, which is to notify Facebook that you have a blog you want posted on your wall, and the social media will do as you command. The implementation, however, was more complicated than that.

Even with Facebook's post-by-email feature, only the blog name and title will appear on the wall, leaving behind the content or link. There are other plugins available, but they don't work as straightforward as they're supposed to be. There is always something missing.

How to Share Blogger post automatically to Facebook using IFTTT

Here is an online utility IFTTT (If This, Then That), which is capable of moving social postings between sites. Setting it up is fairly easy, and just as easy to use. So, let's see how we can share Blogger posts automatically to Facebook using IFTTT.

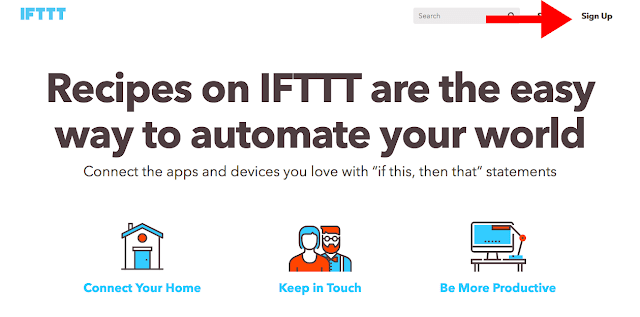
Step 1. Sign up for a free IFTTT account

Visit IFTTT.com and set up an account by creating a username and password.

sign up IFTTT to connect Blogger with Facebook

Now, IFTTT will take you through a mini-tutorial - click on the word 'this', 'that' and 'Continue' button several times. Finally, select 3 channels that interest you and click 'Continue' to finish with the registration.

Step 2. Create a new recipe

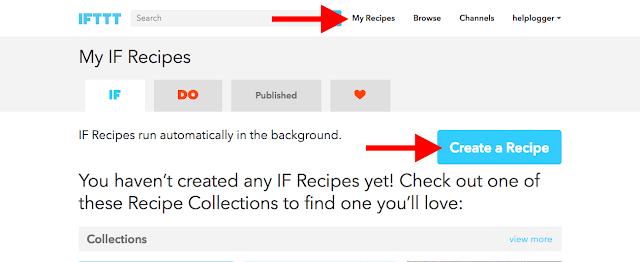
Once registered, we need to 'Create a Recipe'. A recipe is basically the process of combining two platforms together - in our case, we will combine Blogger with Facebook. This shouldn't take more than five minutes.

To get started, click the 'My Recipes' link and then click the 'Create a Recipe' button, as shown below:

create IFTTT Blooger to Facebook recipe

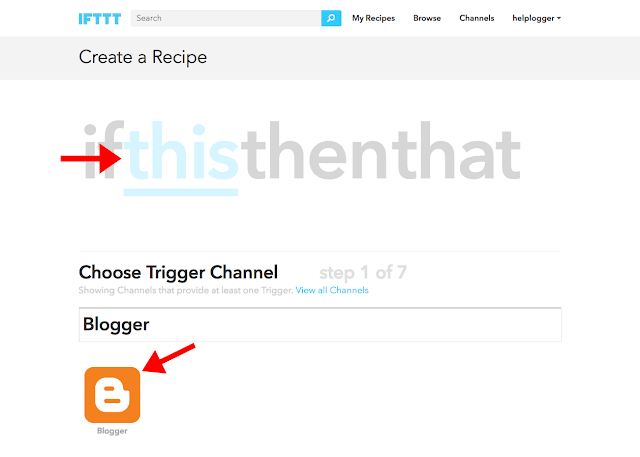
Start creating the recipe by clicking the blue 'this' word and select a "trigger channel". The trigger you need to choose is Blogger - search for it in the box, as illustrated below:

create Blogger recipe using IFTTT


Step 3. Connect Blogger blog with IFTTT

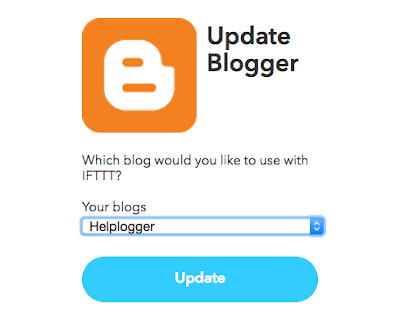
Connect your Blogger account in order to tie it with your IFTTT account. A 'Request for Permission' pop-up will appear > click the 'Allow' button and choose which blog you want to use with IFTTT from the drop-down menu, then click the 'Update' button.

add Blogger blog to IFTTT for automatic posting

After our Blogger blog has been connected, 'Choose a Trigger' that allows you to specify what kind of posts will be published to Facebook. You can choose 'Any new post' or 'New posts labeled'.

automatically publish new Blogger post using IFTTT

Finally, press the blue 'Create Trigger' button to proceed to the next step.

connect Facebook to Blogger to post automatically

Step 4. Creating the 'That' trigger

After registration, Create a Recipe that will specify the direction with which your blog posting will take. Since you want to link Blogger to Facebook, then the Recipe will be - if Blogger, then Facebook. What you're doing is replacing 'this' to Blogger, which is the source, and 'that' to Facebook, which is the target destination.

if Blogger then Facebook IFTTT

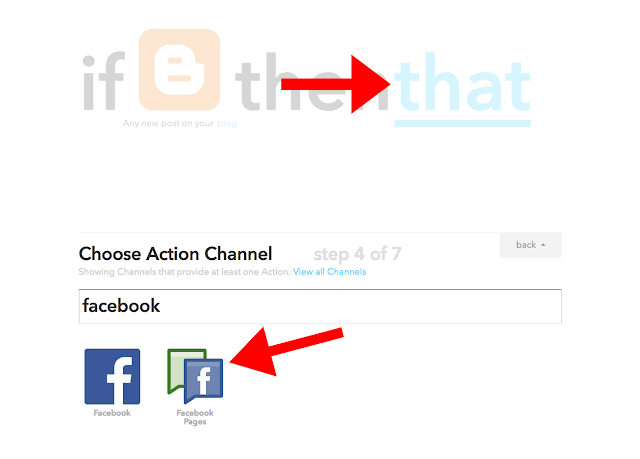
To set up 'that', click on the blue-colored 'that'. This will bring up a window that contains a list of social media sites. Search for 'Facebook' in the box and select the 'Facebook Pages' option (select the plain 'Facebook' option if you want to post to your personal profile).

choose action channel IFTTT facebook

Step 5. Connect Facebook page with IFTTT

Connect your Facebook account. Make sure you are logged into your Facebook account, before you connect. Pressing the 'Connect' button will open a pop-up window to allow IFTTT post on your Facebook page, then select your Facebook page.

connect facebook pages channel on IFTTT

Hit the 'Done' and 'Continue to the next step' buttons and we're almost done...

You will be prompted to 'Choose an Action', where you get to specify if you only want to 'Create a status message', 'Create a link post', or 'Update a photo from URL'. Choose 'Create a link post' as shown below:

post Blogger automatically to facebook

Step 6. Choosing the ingredients

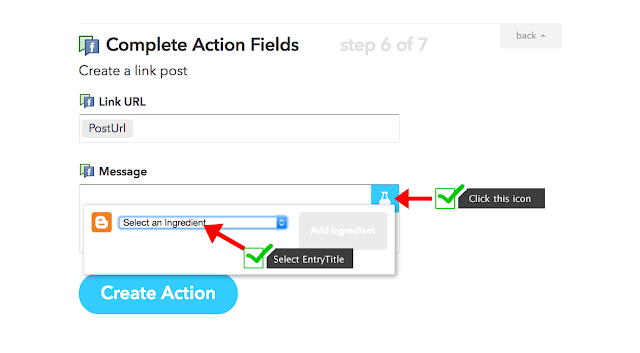
Once you choose an action, a 'Complete Action Fields' window will appear with 'Link URL' and 'Message' box. To add an ingredient, click on the 'Message' field and you'll see a test tube icon on the right hand side. If you click it, a drop-down menu will appear which will let you choose a field to include - select 'PostTitle' and click 'Add Ingredient' blue button on the right side.

IFTTT Blogger recipe ingredients for Facebook

If you are unsure of what each ingredient does, please visit this page.

Step 7. Finish creating the recipe

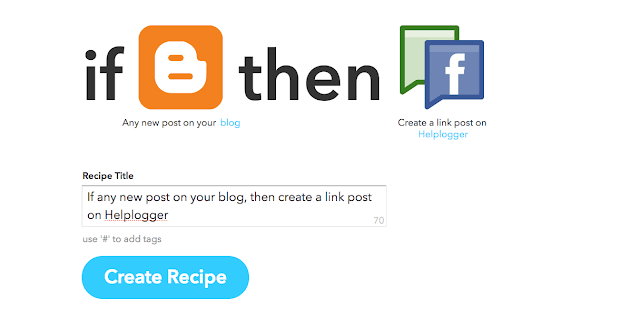
Finally, click the blue 'Create Action' button and your recipe should look something like this:

share blogger post automatically to facebook

To complete your recipe, hit the 'Create Recipe' button.

And that's it! This is how IFTTT recipes are created. Next time you publish a Blogger post, it will be automatically shared to Facebook.

Wednesday, December 3, 2014

Facebook Popup Like Box Widget For Blogger

Facebook has become the leading social media service on the Internet playing host to over 1.3 billion users; of those, 800 million login to their dashboard feeds at least once a day. Thanks to the vast number of active users on services like Facebook, acquiring new readers as a blogger or content provider has become easier than ever.

In order to produce an effective digital campaign, you absolutely must take advantage of social media by doing things like integrating Facebook on Blogger. Email marketing can be useful, but it comes with restrictions that could limit your blog's potential. Perhaps the most significant problem is that emails don't come with a face or personality like Facebook does.

Think of a time when you received an email in you inbox from someone you didn't know. Where you inclined to open it or did you send it right to the junk folder? If it's your first introduction to new consumer, they simply don't know who you are, what you want, and how you got their email. This sets off an initial breakdown of any type of trust that might have developed. The reputation of email marketing is further deteriorated with a study done by Kaspersky Lab, an Internet research firm. They estimate that around 70% of all the emails sent in the world are spam.

Sharing site content using a Facebook Like Box is just one of many strategies that can generate a regular flow of traffic from a diverse demographic that might have been previously inaccessible. Adding a Facebook Like Box to your site helps to reduces your individual workload, and instead distributes that ability equally among your readers.

When someone reads your content and appreciates the kind of work that you produce, they'll be willing to share that information to their followers and fans, setting off a viral reaction. The first step necessary to making this a reality is to make this change to your site. These next few steps will provide you with a quick and easy guide on how to add a 'Like Box' to your Blogger site so that you can began taking advantage of these great opportunities.


Click here for a DEMO


How to Add the Facebook Popup Like Box Widget

1. Log into your Blogger account and select your blog > go to 'Layout' & click the 'Add a Gadget' link on the right side.
2. Once the popup window is open, select the HTML/JavaScript gadget from the list:


3. Copy and paste the following code inside the empty box:
<script src='http://ajax.googleapis.com/ajax/libs/jquery/1.7.2/jquery.min.js' type='text/javascript'></script>
<style type="text/css">
#fbox-background{display:none;background:rgba(0,0,0,0.8);width:100%;height:100%;position:fixed;top:0;left:0;z-index:99999}#fbox-close{width:100%;height:100%}#fbox-display{background:#eaeaea;border:5px solid #828282;width:340px;height:230px;position:absolute;top:32%;left:37%;-webkit-border-radius:5px;-moz-border-radius:5px;border-radius:5px}#fbox-button{float:right;cursor:pointer;position:absolute;right:0;top:0}#fbox-button:before{content:"CLOSE";padding:5px 8px;background:#828282;color:#eaeaea;font-weight:700;font-size:10px;font-family:Tahoma}#fbox-link,#fbox-link a.visited,#fbox-link a,#fbox-link a:hover{color:#aaa;font-size:9px;text-decoration:none;text-align:center;padding:5px}
</style>
<script type='text/javascript'>
//<![CDATA[
jQuery.cookie=function(a,b,c){if(arguments.length>1&&"[object Object]"!==String(b)){if(c=jQuery.extend({},c),null!==b&&void 0!==b||(c.expires=-1),"number"==typeof c.expires){var d=c.expires,e=c.expires=new Date;e.setDate(e.getDate()+d)}return b=String(b),document.cookie=[encodeURIComponent(a),"=",c.raw?b:encodeURIComponent(b),c.expires?"; expires="+c.expires.toUTCString():"",c.path?"; path="+c.path:"",c.domain?"; domain="+c.domain:"",c.secure?"; secure":""].join("")}c=b||{};var f,g=c.raw?function(a){return a}:decodeURIComponent;return(f=new RegExp("(?:^|; )"+encodeURIComponent(a)+"=([^;]*)").exec(document.cookie))?g(f[1]):null};
//]]>
</script>
<script type='text/javascript'>
jQuery(document).ready(function($){
if($.cookie('popup_facebook_box') != 'yes'){
$('#fbox-background').delay(5000).fadeIn('medium');
$('#fbox-button, #fbox-close').click(function(){
$('#fbox-background').stop().fadeOut('medium');
});
}
$.cookie('popup_facebook_box', 'yes', { path: '/', expires: 7 });
});
</script>
<div id='fbox-background'>
<div id='fbox-close'>
</div>
<div id='fbox-display'>
<div id='fbox-button'>
</div>
<iframe allowtransparency='true' frameborder='0' scrolling='no' src='//www.facebook.com/plugins/likebox.php?
href=https://www.facebook.com/pages/Helplogger/120574614736021&width=339&height=255&colorscheme=light&show_faces=true&show_border=false&stream=false&header=false'
style='border: none; overflow: hidden; background: #fff; width: 339px; height: 200px;'></iframe>
<div id="fbox-link">Powered by <a style="padding-left: 0px;" href="http://helplogger.blogspot.com/2014/12/facebook-popup-like-box-blogger-widget.html" rel="nofollow">Helplogger</a></div>
</div>
</div>
4. Press the 'Save' button to add the widget to your blog. That's it!

Facebook Popup Like Box Customization

After adding the code, replace the address in blue https://www.facebook.com/pages/Helplogger/120574614736021 with your site's facebook page URL.

The widget will appear 5 seconds after the page finishes loading. If you want to change this delay, change the number 5000 to a greater or lesser number in this part:
.delay(5000)
By default, the like box only shows up the first time the user visits your page.  If you would like the Facebook box to popup every time the page loads, then remove this line of code:
$.cookie('popup_facebook_box', 'yes', { path: '/', expires: 7 });
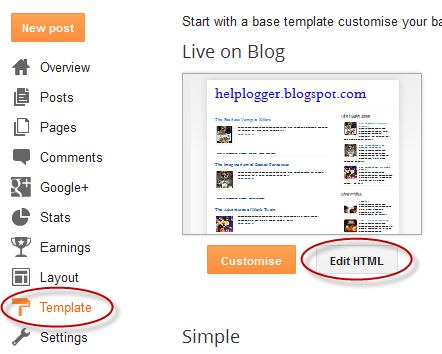
If you want to display only when user visits your homepage, go to 'Template' > hit the 'Edit HTML' button on the right side and search by clicking anywhere inside the code area and pressing the CTRL + F keys for this tag:
</body>
Paste the facebook popup widget right above the body tag and make sure to include the conditional tags below:
<b:if cond='data:page.type == "index"'>ADD THE FACEBOOK WIDGET CODE HERE </b:if>
After saving this widget, you can test it out by returning to one of your old posts which should bring up a little popup widget asking if you'd like to join the site's Facebook page.

If you don't see the Facebook Like Box on the page, you may need to delete your cookies or check out the 'Customization' section above in order to display the widget every time a user visits your site. Once this widget is added to your site, all your hard work should start to translate into an increase in web traffic and number of Facebook fans.

Thursday, February 20, 2014

Add floating social media sharing buttons below Blogger post titles

It is becoming increasingly important to make our posts appreciated and shared on social networks and one of the best ways to get traffic to our blog or site and boost sharing stats is to add social sharing buttons.

In this tutorial we will see how to add a floating social media sharing bar below the title of Blogger posts, so when a reader scrolls down the page, he will still be able to see the sharing buttons without having to scroll back to the top.

Adding the below jQuery script will make the buttons float in a fixed position as soon as they reach "the top" of the page. By scrolling back, the buttons will return to their initial position.

The social sharing bar includes buttons for Facebook, Twitter, Google+, and Pinterest.

Social Media Sharing Buttons below Blogger Post Title

Step 1. From the Blogger Dashboard, go to "Template" and click on the "Edit HTML" button:


Step 2. Click anywhere inside the code area and press the CTRL + F keys to open the search box. Once you see the search box, type the </head> tag inside the search box and hit Enter to find it.

blogger search box, ctrl + f

Step 3. Just above </head> add this script:
<script src='http://ajax.googleapis.com/ajax/libs/jquery/1.7.1/jquery.min.js' type='text/javascript'/>

<script type='text/javascript'>
//<![CDATA[
$(function() {
var $movesbuttons = $("#floating-social-buttons"),
$window = $(window),
offset = $movesbuttons.offset();
$window.scroll(function() {
if ($window.scrollTop() > offset.top) {
$movesbuttons.css({'position' : 'fixed', 'width' : '550px', 'top' : '0px'});
} else {
$movesbuttons.css({'position' : 'absolute', 'top' : 'auto'});
}
});
});
//]]>
</script>
Step 4. Now before the ]]></b:skin> tag (press CTRL + F to find it) add the following CSS styles:
#floating-social-buttons {
padding: 6px 0px 12px;
position: absolute;
background: #F6F6F6;
border-bottom: 1px solid #DEDEDE;
width: 550px;
height: 18px;
z-index: 99;
}
.floating-social-buttons {
margin-left: 5px !important;
}
.floating-social-buttons li {
float: left;
margin-left: 5px;
list-style:none;
}
To change the width of the bar, modify the 550px values in red. Note that this value also appears in the script which also needs to be modified.

Step 5. Finally, just below the second <div class='post-header'> (press CTRL + F and hit Enter twice to find the second one) add the following code:
<b:if cond='data:blog.pageType == &quot;item&quot;'>
<div style='padding:5px 0 35px 0;clear:both;'>
<div id='floating-social-buttons'>
<ul class='floating-social-buttons'>

<li><iframe allowTransparency='true' expr:src='&quot;http://www.facebook.com/plugins/like.php?href=&quot; + data:post.url+ &quot;&amp;layout=button_count&amp;show_faces=false&amp;width=100&amp;height=25&amp;action=like&amp;font=tahoma&amp;colorscheme=light&quot;' frameborder='0' scrolling='no' style='border:none; overflow:hidden; width:100px; height:25px;'/></li>

<li><a class='twitter-share-button' data-lang='en' href='https://twitter.com/share'>Tweet</a><script src='//platform.twitter.com/widgets.js' type='text/javascript'/></li>

<li><script src='http://apis.google.com/js/plusone.js' type='text/javascript'/><g:plusone expr:href='data:post.url' size='medium'/></li>

<li><a class='pin-it-button' count-layout='horizontal' expr:href='&quot;http://pinterest.com/pin/create/button/?url=&quot; + data:post.url + &quot;&amp;media=&quot; + data:post.thumbnailUrl + &quot;&amp;description=&quot; + data:post.snippet' style='margin:0 10px 5px 0;'>Pin It</a> <script src='http://assets.pinterest.com/js/pinit.js' type='text/javascript'/></li>

</ul>
</div>
</div>
</b:if>

Customizing the Floating Social Media Sharing buttons

If you want the buttons to appear at the end of the post, paste this code before or after <div class='post-footer'>
If the bar overlaps with the post content, then change 35px to a higher value.

Step 6. Click on the "Save template" button and you're done!

So these were the steps for adding the horizontal social buttons bar on Blogger. Using this bar it is also useful as it could help you to get more social traffic for your blog.

Sunday, May 26, 2013

How To Add Social Media Icons to Blogger Header

social media icons, facebook icons, social media icons for bloggerThis tutorial will help you to add social media icons in the top right corner of the page which could increases the likelihood that readers can follow through the various social networks. There are several ways to do this, like adding a new widget section to the blog header but now, we'll do it using an unordered list that uses icons of Facebook, Twitter, Google+ and blog feed, and as a bonus, the icons will rotate when you hover over them.

You can see a demo in this test blog.


Adding Social Media Icons to Blogger Header

Step 1. From your Blogger dashboard, go to Template and click on the Edit HTML button:

blogger blogspot, blogger template, blogger gadgets

Step 2. To expand the style, click on the small arrow on the left of <b:skin>...</b:skin> (screenshot 1), then click anywhere inside the code area to search (using CTRL + F) for the ]]></b:skin> tag (screenshot 2) and add this code just above it:

 /* Social icons for Blogger
----------------------------------------------- */

#social-icons {
margin-bottom:-30px;
height:50px;
width:100%;
clear:both;
z-index: 2;
position: relative;
}
.social-media-icons {
display:table
}
.social-media-icons ul {
text-align:right;
padding:5px 5px 0 0
list-style-image:none;
list-style-position:outside;
list-style-type:none;
}
.social-media-icons ul {
margin-bottom:0;
padding:0;
float:right;
}
.social-media-icons li.media_icon {
margin-left:6px;
padding-left:0 !important;
background:none !important;
display:inline;
float:left;
}
.social-media-icons li:hover {
-moz-transform: rotate(360deg);
-webkit-transform: rotate(360deg);
-o-transform: rotate(360deg);
transform: rotate(-360deg);
-moz-transition: all 0.5s ease-in-out;
-webkit-transition: all 0.5s ease-in-out;
-o-transition: all 0.5s ease-in-out;
-ms-transition: all 0.5s ease-in-out;
transition: all 0.5s ease-in-out;
}

Screenshot 1:


Screenshot 2:


Step 3. Now search for this line

<b:section class='header' id='header' maxwidgets='1' showaddelement='no'>

Step 4. And just above it, add this code:

<div class='social-media-icons' id='social-icons'>
<ul>

<li class='media_icon'><a href='http://facebook.com/username'><img border='0' src='https://blogger.googleusercontent.com/img/b/R29vZ2xl/AVvXsEjOCE8ZcOdAj_wUR14dMoVJJjCWS8i-yGrUEIW1pnQPVebhXUtXqhWMT3IJdh2y0ITm51s8a1sAWHHTfS5oO17QP_Oo305rqUH_Bjy2BbwcSHCtFhqLSId0n0lwJCDWhTXjoX4CYvge6B0/s1600/Facebook.png'/></a></li>

<li class='media_icon'><a href='http://twitter.com/#!/username'><img border='0' src='https://blogger.googleusercontent.com/img/b/R29vZ2xl/AVvXsEiRup5oRtslppAqoLwUPVp1DWNmg-3o0D5n6pXnVXGpzGb2AUQmHLegV6ojJ2zbsGL8gGCOuZMp3oHvLzE-Rl6aaCOEQ-XB8yDzceLF6tciz8YvEHqwU5-qtiizajn9xcK2uNeyBDiPtG8/s1600/Twitter.png'/></a></li>

<li class='media_icon'><a href='https://plus.google.com/XXXXXXXXXXXXXXXXXX/about'><img border='0' src='https://blogger.googleusercontent.com/img/b/R29vZ2xl/AVvXsEh18bTVjaZ1MQiGprBrGVHz-dRgsCrgrxKL4iGujh06O2NTOsdSlbEcslaFpZ0gPohsSaCAeLzy_WufyAyHcENfVPcOr54wAFKdeD65Wi5tMi5uhnTJLO1CbrwHxB6S3cbwEFlAJOhtxco/s1600/googleplus.png'/></a></li>

<li class='media_icon'><a href='http://name-of-your-blog.com/feeds/posts/default'><img border='0' src='https://blogger.googleusercontent.com/img/b/R29vZ2xl/AVvXsEharEKGWGRpFTZhe2AgcLLjzd3yW-pBzoBLi4Rks3ASH9TIkAppHLMC_QgMeY-3fXxVk8agIW9ooUD-duIh5gy0vOwSof7qrWqfsftc2jDzDmTI6o4xk_BoCe8q3NJTu03s8yMjP2D5qdY/s1600/RSS.png'/></a></li>

</ul></div>

Customization

- Change what's in red with your usernames and id: the first is your Facebook username, the second is that of Twitter, in the third you should change the X by the ID of your Google+ profile and in the fourth you will put the name of your blog.
- To change the icons, just replace the urls in blue with the ones of your images.
- You can add more icons if you want, you just have to add before </ul></div> a line like this for each extra icon you want:

<li class='media_icon'><a href='Link URL'><img border='0' src='Image URL'/></a></li>

Step 5. Finally, Save the Template to apply the changes.
The effect is done with CSS3, so this effect will not work in older browsers.