Showing posts with label Blogger Tutorials. Show all posts

Wednesday, December 21, 2016

How to Start/Create a Blog On Blogger For Beginners

Hello! Friends Welcome to our "Learn Blogging" Series Part 1. In part #1 I will tell you how to create a blog on blogger.com and some basics information that you must know so without wasting any time let's get started.


First go to blogger.com and click on create your blog button and then sign in with your google account.

As you can see in this image enter your favorite blog title or address and then choose your favorite theme, remember you can change your theme later. Now click "Create blog!" button.

Now, you have successfully created your blog.
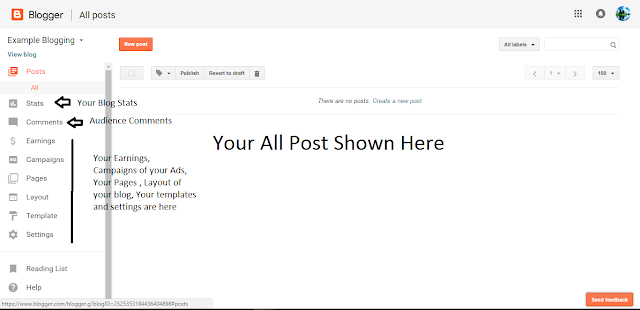
After creating your blog you will see interface like this.


As you can see how your interface looks like. To create a new post just click "New Post"

Few Blogger Tips


1- Add few images in your blogger post.

2-Be Familiar with your viewers.

3-Write articles in about minimum 300 words

4-Choose Best SEO ready templates for blogger.

5- Be Consistent (Most Important)

6- Write the Truth don't write wrong things.


This post is specially for those people who is very beginners people because I know few people who is don't know how to create a blog so In next "Learn Blogging" Series we will learn about professional templates editing so plz comment and share thispoost.

Friday, August 26, 2016

Add "Back To Top" Button In Blogger Blog With Smooth Scrolling

back-to-top-button-for-blogger


In today’s tutorial we’ll show you how to add "back to the top" button in blogger blog with smooth scrolling in a easy steps. The button we’re going to create will see in the bottom-right of the page and it appears only when users scroll down the page allowing them to scroll to the top of the page.

If your blog have a lot of information or you write very long posts then you must have to add this widget in your blogger blog to make better user experience.


 Note:  In the process a mistakes might be made, so please backup your template before making any changes.

Lets start the tutorial.

Step 1. In this button we are going to use font awesome so we need to add it in template.

 Note:  If there is already a font awesome library in your template, ignore below code and go for the further steps.

[<link href='//netdna.bootstrapcdn.com/font-awesome/4.0.3/css/font-awesome.css' rel='stylesheet'/>]

Step 2. To add Back to Top button in blogger just navigate to Blogger Dashboard >> Template >> Edit HTML and Search for the code ]]></ b: skin>.

Now copy the below CSS code and paste it exact before   ]]></b:skin>  section.

 [#return-to-top {
    position: fixed;
    bottom: 20px;
    right: 20px;
    background: rgb(0, 0, 0);
    background: rgba(0, 0, 0, 0.7);
    width: 50px;
    height: 50px;
    display: block;
    text-decoration: none;
    -webkit-border-radius: 35px;
    -moz-border-radius: 35px;
    border-radius: 35px;
    display: none;

}
#return-to-top i {
    color: #fff;
    margin: 0;
    position: relative;
    left: 16px;
    top: 10px;
    font-size: 19px;
    -webkit-transition: all 0.3s ease;
    -moz-transition: all 0.3s ease;
    -ms-transition: all 0.3s ease;
    -o-transition: all 0.3s ease;
    transition: all 0.3s ease;
}
#return-to-top:hover {
    background: rgba(0, 0, 0, 0.9);
}
#return-to-top:hover i {
    color: #fff;
}]

Step 3. Now, find a </body> tag in your templates and paste below piece of code before </body> tag.

[</script>
<a href='javascript:' id='return-to-top'><i class='fa fa-chevron-up'/></a>
<script type='text/javascript'>
// ===== Back to Top ====
$(window).scroll(function() {
    if ($(this).scrollTop() &gt;= 50) {       
        $(&#39;#return-to-top&#39;).fadeIn(200); 
    } else {
        $(&#39;#return-to-top&#39;).fadeOut(200);  
    }
});
$(&#39;#return-to-top&#39;).click(function() {    
    $(&#39;body,html&#39;).animate({
        scrollTop : 0                     
    }, 500);
});
</script>]

Step 4. Finally, Save your template and see the result.

Bottom Line


So, this was the easy tutorial on how to add back to top button in Blogger. usually you can customize this code easily but if you are newbie then use the default code.

I hope that you found it helpful and I’m sure it will benefit for your readers.

If you still facing any problem while installing this widget then just drop your query in below comment box. I would love to hear from you and help you out. Happy Blogging!

Tuesday, August 23, 2016

Advanced SEO Setting For Blogger: Meta Tags, Robots.txt, 404 Page And More

advanced-seo-setting-for-blogger


Blogger is one of the most SEO friendly blogging platform as compared to other platforms as everyone know, but you have to enable some advanced seo settings in blogger to make your blog more search engine friendly. Most newbies usually get the basics done well when they start their blog. as we all know Google have added some SEO features in blogger to make your blog more search engine friendly.

However, in this post you will learn step by step how to enable advanced SEO setting for blogger blog. by enabling it you can optimize your blog easily for all search engines. so let's start the tutorial.

#1. Securing Blogger (HTTP to HTTPS)


HTTP redirect is one of the best feature recently added by google in blogger to create secure communication over a computer network. and google gives more importance for HTTPS enabled websites.

What is HTTPS? 


HTTPS is basically a secure version of HTTP. it means your blog data which is transferred between the user and server is now encrypted and protected from access or stealing from hackers.

Benefits of HTTPS  


  • It tells your visitors that you have opened correct website and aren’t being redirected to a malicious site.
  • It helps detect if an attacker tries to change or hack any data sent from Blogger to the visitor.
  • It adds security measures that make it harder for other people to listen to your visitors’ conversations, track their activities, or steal any private information.

However, this is the free service and you don't need to spend money for getting SSL certificate to make secure connection for your blog.

To turn on HTTP to HTTPS go to your blogger blog and click on Settings >> Basic >> HTTPS and select Yes option (as shown in image).

blogger-seo

#2. Meta Tag Description 

Meta description is another important advanced SEO setting for blogger which helps visitors choose to click on your blog in search results by Meta Description. Here you can write a compelling summary (max 150 words) of what your blog is all about with your " main keywords".

To enable meta tag search description go to your blogger blog and click on Settings >> Search Preferences >> Meta tags >> and select Yes option. now add your blog description and click on save button (as shown in image).

seo-settings-meta-tags-blogger

#3. Custom 404 Page Not Found


This is most crucial SEO setting in blogger. we must enable this setting in blogger for better SEO and user experience.

404 page not fount is a error page shows when visitor clicks on broken link of your blog post. it tells your readers that you have clicked on broken link and this page is doesn't exist anymore.

seo-settings-for-blogger

I have created short JavaScript for this setting you can add it by going on blogger  Settings >> Search Preferences >> Errors and redirections >> Custom Page Not Found >> and select Edit option. now simply copy below JavaScript and past it in empty box.

To complete tutorial Read: How To Redirect 404 Error (Page Not Found) To Homepage In Blogger

  JavaScript  

[<h1>Ooops.... 404 Error Page Not Found!</h1>
<br><b>We're sorry but we could not find the page you are looking for.
This may happen if you have entered site URL incorrectly or this page doesn't exist anymore.</b>
<script type = "text/javascript">
BSPNF_redirect = setTimeout(function() {
location.pathname= "/"
}, 5000);
</script>]

#4. Custom Redirects


This is one of the most important SEO setting in blogger. If you had deleted some blog post then the link of these posts will broke, to deal with the broken links you have to paste your broken and new post link in custom redirects option which you will find exact below Errors and redirections.

If visitors click on broken link they they will redirect to your new post link. to find out all your blog crawl error broken links, go to your Google Webmasters Tool
  
seo-settings-for-blogger

#5. Custom Robots.txt File


Robots.txt is a command file for the search engine robots to explore or browse a pages of your blog. Robots.txt is arguably filter our blog from search engines. by adding this file you can tell google robots which information crawl and which don't.

Read Also: How To Add Custom Robots.txt File In Blogger/Blogspot

To add Robots.txt file to your blogger blog just click on your blog Settings >> Search Preferences >> Crawlers and indexing >> Custom robots.txt >> Paste below code in box.


[User-agent: *
Disallow: /search
Allow: /
Sitemap: http://yourblogname.com/atom.xml?redirect=false&start-index=1&max-results=500]

  Note:   Replace http://yourblogname.com with your blog URL


seo-settings-for-blogger

#6. Custom Robots Header Tags


This is another most important SEO setting for blogger. to setup this option go to your blog Settings >> Search Preferences >> Crawlers and indexing >> Custom robots header tags >> Edit >> Yes.

To make this process easy for you i have selected tags in below tags . so just select the tags just like i have selected in below screenshot.   

seo-settings-for-blogger

#7. Nofollow/Open In New Tab


seo-settings-for-blogger


In above image i have selected Open this link in new window, which helps you to open link in new tab and it also helps to reduce your bounce rate and second one is rel="nofollow" tells search engines to do not crawl this link (don't show this link in search results).

  Note:   Use rel="nofollow" link attribute only when you have to link to irrelevant sites/pages that you don’t trust or don't want to show this link in search results.

Conclusion


So this is the complete tutorial on Advanced SEO Setting For Blogger. by adding/enabling this features you will surely make your blog more search engine friendly. if you still facing any problems and confusing let's join me in below comment box.

Do you liked this post, if yes then please do share. and if i missed anything please let me know. stay blessed!

Thursday, August 18, 2016

How To Write Perfect SEO-Optimized Articles In Blogger


write-seo-optimized-article

As a blogger when we write blog article, we should optimize each and every blog post for search engine and also for blog readers so that it will improve the ranking on a search engine.

Google has algorithms which automatically rank your blog/website. they does not have any human workers, so whenever you publish new article on your blog, they send out spiders to crawl your article and check it all things that indicates whether your article is useful or useless. sometimes they does not index some articles which imply that your article doesn't make any sense for google.


I found many bloggers out there (especially from blogspot platform), who has blog with many quality and useful articles, but someway I realized that articles getting only plenty of views and others not getting good traffic.

Well, how do you get more traffic if you are writing blog posts without doing SEO-optimization

Most of the beginners don't know how to write SEO-optimized articles in blogger. so i decided to write full post on it.


Writing SEO-Optimized Articles In Blogger


Step 1. Write SEO Friendly Post Title 


Post title & description it's only two things that appears in search results that force the visitors to click on your link to read the full post. so it must be short, catchy and to the point.

You can add your focus keyword in post titles. it helps to tell search engines exact what is your post is all about?

Step 2. Publish High Quality Contents


First thing you have to remember that, when you write article for your blog , make sure that you publish high quality and original content. It should not be stolen from anywhere otherwise Google will punish you for that and you lose your rankings in search results.

Your article should be keyword rich with at most 3% of keyword density. and it must be 400-500 words or more than that because google loves to serve well defined article for his visitors.

Step 3. Optimize Images 


 Compress the image size - compress images to change size of images to make your blog load faster.

You can do that by using online tool Tinypng.com

Change image name - Before uploading any image for blog just make sure you have renamed this image with relevant name.

Alt tag, Title tag - In blogger you don't have to touch the html code to add this tag's to images. you just have to click on image (shown in above image) >> Properties >> add alt tag and title tag inside the box.

Know More : 6 Image Optimization Tips For Better Search Engine Ranking


Step 4. Keyword Placement


According to moz.com your focus keyword should appear in the first 100-150 words (1st paragraph) of the article.

If you do not set a search description for your page, Google will automatically grab the beginning 100-150 words of your content as a search description. expect this add your keywords in search description as well.

I recommend you to use only one targeted keyword in a post. If you are targeting multiple keywords in single post then it will make difficult for search engines to identify your post.

You can Google Keyword Planner Tool to find out the best keywords that will bring you loads of search traffic. 

Put your main keyword in
  1. Article Heading
  2. Post Title
  3. Page URL
  4. Content
  5. Search Description

Step 5. Optimize Blog Post Setting


In the left side of post editor you will see "Post setting" section. with the help of this section you can improve SEO of your blog post by adding blog post labels, permalink, search description etc.

Important Settings To Edit

After writing your post you have to edit 3 important setting to improve SEO of your article which i have explained below and highlighted in image.


Labels (Tags): help to group your blog posts together & act as a category.

Permalink (URL): By default, Blogger takes your post URL from your title but sometimes  it removes the extending characters from permalink, if you have a long title.  The permalink feature allows you to add custom URL of post that you can put your focus keywords in URL.

Here is example of Automatic Permalink vs Custom Permalink:

Automatic (Bad for SEO):

http://www.yourblogaddress.com/this-is-super-long-automatic-permalink-blah-blah-blah.html

Custom (Recommended):

http://www.yourblogaddress.com/blogspot-custom-permalink.html

Search Description (Meta Description): In this section, you need to write short summery (approximately 156 characters) about your post with your important keywords.

Step 6. Use Bold And Italic Tag


Most probloggers uses bold and italic tags to highlight keywords. and i recommend you to use it in your blog posts effectively.


Using these tags to highlight targeted keywords or important text in your contents will help you for improving rankings. and it also helps to reduce bounce rate.

Conclusion

So this is the simple basic tutorial on writing perfect SEO optimized articles in blogger for beginner blogger.  

If you are not getting good traffic from search engines then you may follow this post to make article seo friendly and really make sense to google.

If this post has helped you, kindly do share.

Thursday, March 24, 2016

How To Create Privacy Policy Page For Blogger And Wordpress?

privacy-policy

Every professional blog has a privacy policy page which is a statement or a legal document that discloses how your site/blog gathers and store information from visitors while they're on your blog.

Many ad serving programs, like Google Adsense, require privacy policy page on your blog to participating in their advertising network.

In this tutorial i will show you how to create privacy policy page and set that up to your blogger and WordPress blog.

Create A Privacy Policy Page For Your Blog: 

You must be thinking..... how to create it? let's make it easy for you :)

You don't need to write it yourself or you don’t need a lawyer any way. there are tones of  Privacy Policy Generators you will get.

Below are some simple steps you have to go through in terms to create privacy policy page without getting any shot.

1) Just go to the SerpRank privacy policy generator page and click on register button.
2) Now select Serp Rank basic level
3) Fill the account information as shown in image below.

Privacy Policy Page For Blogger And Wordpress?

4) Accept terms and conditions and hit Submit and Conform button
5) Now Click Here to go main page.
6) Fill the form as shown in below screenshot. 

Privacy Policy Page For Blogger And Wordpress?

9) After filling up all the details, click on "Create my Privacy Policy" button.
10) Now copy your privacy policy.

Adding Privacy Policy Page In Blogger:


1) Open your Blogger Dashboard >> Pages>> click on New page link.
2) Give a page title as a "Privacy Policy".
3) Now paste that copied policy in your newly created page.
4) Click on Publish button. now place this page wherever you want to display (Footer or Header).

Adding Privacy Policy Page In WordPress:


1) Go to your WordPress Dashboard.
2) Click Pages >> Add new.
3) Give a title as a "Privacy Policy" and paste the copied privacy policy into the post editer.
3) Click on Publish button.

Final Words !

I have tried explaining almost every single detail in this article. Still if you are getting any trouble while adding privacy policy page on your blog then please open your mind and feel free to ask me it would be a pleasure helping you.

Tuesday, March 17, 2015

5 Examples To Customize Blockquote Style In Blogger And WordPress

Customize Blockquotes Style In Blogger And WordPress

Blockquotes are usually used to indicate the quotation of a large section of text from external sources or highlight someone's quotes, thoughts in blog article.

Now day's every blogger started to using it on their blog to make blog article stand out and grab the reader’s attention.

Usually all blogging platform has a default styling for Blockquotes, but we should modify a default styling with something in relevance with your theme/template. So, this tutorial will show you how to customize blockquote style in Blogger and WordPress. along with it I'll present 5 stylish examples of customized blockquotes styles for your blog using CSS.

We'll be using different pseudo-elements like   :before :after   for creating a unique look for 5 examples. 

Many bloggers have a curiosity to know Is there an advantage or impact for SEO of blockquotes?

No! I don't think so, there are many probloggers uses blockquote on their blog and I haven't seen any example that tells me it can heart SEO. but it actually help you to rank well on Google. What do you say about it?

How To Customize Blockquote Style In Blogger/Blogspot:


To add customized blockquote style in blogger just navigate to Blogger Dashboard >> Template >> Edit HTML and Search for </head>
 
Now choose one of the styles suggested below and copy the CSS code and paste it before </head> tag.
Done! Save your template!

Now whenever you want to add blockquote style in your blog post just copy that text which you want to appear as a blockquote and hit icon as shown in below screenshot:

Blogger Blockquote


How To Customize Blockquote Style In WordPress Themes:


It's quite simple to add blockquote style in WordPress themes, you need to add the following codes to style.css or custom.css file of your theme. You can do this with another way just go to Appearance » Editor in your WordPress admin or edit.

Now, pick out on of the styles suggested below and design your blog/website for a better user interface.

wordpress blockquote


#BlockQuote Style 1: Simple


 In this example I have used Unicode for left double quote. you can increase the size of quotation mark just edit  font-size:4em;  with you size.

blockquote

BlockQuote Style 1 For Blogger:


<style>
.post blockquote {
background:#f9f9f9;
border-left:6px solid #ccc;
font-family: Georgia, serif;
margin:1.5em 10px;
padding:.5em 10px;
quotes:"\201C""\201D""\2018""\2019";
}
.post blockquote:before {
color:#ccc;
content:open-quote;
font-family: cambria, Georgia;
font-size:4em;
line-height:.1em;
margin-right:.25em;
vertical-align:-.4em;
}
.post blockquote p {
display:inline;
}
.post blockquote cite {
color: #999999;
font-size: 14px;
display: block;
margin-top: 10px;
}
</style>

BlockQuote Style 1 For WordPress:

    blockquote {
    background:#f9f9f9;
    border-left:6px solid #ccc;
    font-family: Georgia, serif;
    margin:1.5em 10px;
    padding:.5em 10px;
    quotes:"\201C""\201D""\2018""\2019";
    }
    blockquote:before {
    color:#ccc;
    content:open-quote;
    font-family: cambria, Georgia;
    font-size:4em;
    line-height:.1em;
    margin-right:.25em;
    vertical-align:-.4em;
    }
    blockquote p {
    display:inline;
    }
    blockquote cite {
    color: #999999;
    font-size: 14px;
    display: block;
    margin-top: 10px;
    }

#BlockQuote Style 2: Hover Effect


This was my favorite style, I found it on codepen, In this example you can see mouse hover effect which is looking really elegant.

Blockquote With Hover Effect
  

BlockQuote Style 2 For Blogger:


   <style>
   .post blockquote {
    text-align:left;
    font: 16px/24px Arial, sans-serif;
    color: #555;
    padding: 0.5em 10px;
    margin: 1.5em 10px;
    }
    .post blockquote:before {
    content: open-quote;
    font-size: 24pt;
    text-align: center;
    line-height: 42px;
    color: #fff;
    background: #ddd;
    float: left;
    position: relative;
    border-radius: 25px;
    margin-right: 0.5em;
    vertical-align: -0.4em;

    display: block;
     height: 25px;
     width: 25px;
    }
    .post blockquote:after {
    content: close-quote;
    font-size: 24pt;
    text-align: center;
    line-height: 42px;
    color: #fff;
    background: #ddd;
    float: right;
    position: relative;
    border-radius: 25px;
    margin-right: 1em;
    vertical-align: -0.5em;

    display: block; 

    height: 25px; 

    width: 25px;
    }
    .post blockquote:hover:after, blockquote:hover:before {
    background-color: #555;
    transition: all 350ms;
    -o-transition: all 350ms;
    -moz-transition: all 350ms;
    -webkit-transition: all 350ms;
    }
    </style>

BlockQuote Style 2 For WordPress:


blockquote {
text-align:left;
font: 16px/24px Arial, sans-serif;
color: #555;
padding: 0.5em 10px;
margin: 1.5em 10px;
}
blockquote:before {
content: open-quote;
font-size: 24pt;
text-align: center;
line-height: 42px;
color: #fff;
background: #ddd;
float: left;
position: relative;
border-radius: 25px;
margin-right: 0.5em;
vertical-align: -0.4em;
display: block;
height: 25px;
width: 25px;
}
blockquote:after {
content: close-quote;
font-size: 24pt;
text-align: center;
line-height: 42px;
color: #fff;
background: #ddd;
float: right;
position: relative;
border-radius: 25px;
margin-right: 1em;
vertical-align: -0.5em;
display: block;
height: 25px;
width: 25px;
}
blockquote:hover:after, blockquote:hover:before {
background-color: #555;
transition: all 350ms;
-o-transition: all 350ms;
-moz-transition: all 350ms;
-webkit-transition: all 350ms;


#BlockQuote Style 3: Using Dashed Border And Background Quote Image


In this example I have added dashed border around blockquote, Image for double quote and I have used Muli font from Google web fonts library. 

blockquote styling with dashed border


BlockQuote Style 3 For Blogger:


<style>
.post blockquote {
@import url(http://fonts.googleapis.com/css?family=Muli);
background:url(https://blogger.googleusercontent.com/img/b/R29vZ2xl/AVvXsEgVo2vmadAgsZ22Y8AXhsV5hG3-MVrBn_50S-hFSbQa_IK3EyLCI80gOvcdilqY6BGIAbcl73Sj3Y0rjbdZ0ACQUxjQacHaAIvIOL9-HdT6J0zRjyVWqewTs-BI9oatjkTZDdrpv8JUt3cl/h120/blockquote.png) no-repeat;
border: dashed 2px #ccc;
color: #333;
font-family: muli;
margin: 30px;
padding: 20px 30px 30px 40px;  

</style>

BlockQuote Style 3 For WordPress:


blockquote {
@import url(http://fonts.googleapis.com/css?family=Muli);
background: url(https://blogger.googleusercontent.com/img/b/R29vZ2xl/AVvXsEgVo2vmadAgsZ22Y8AXhsV5hG3-MVrBn_50S-hFSbQa_IK3EyLCI80gOvcdilqY6BGIAbcl73Sj3Y0rjbdZ0ACQUxjQacHaAIvIOL9-HdT6J0zRjyVWqewTs-BI9oatjkTZDdrpv8JUt3cl/h120/blockquote.png) no-repeat;
border: dashed 2px #ccc;
color: #333;
font-family: muli;
margin: 30px;
padding: 20px 30px 30px 40px;  


#BlockQuote Style 4:


Example 4 will have cool circle around quotation mark. 
 
blockquote


BlockQuote Style 4 For Blogger:


<style>
.post blockquote{
font-family: Georgia, Times, "Times New Roman", serif;
font-size: 16px;
border-top: solid 2px #dddddd;
border-left: solid 2px #dddddd;
border-right: solid 2px #dddddd;
border-bottom: solid 2px #dddddd;
margin: 1em 0px;
padding: 1em 1em;
font-family: Georgia, Times, "Times New Roman", serif;
font-style: italic;
font-size: 1em;
min-height: 60px;
}
.post blockquote:before {
display: block;
float: left;
content: "\201C";
font-size: 100px;
margin-right: 10px;
color: #fff;
background-color: #03C9A9;
padding: 15px 12px 5px 8px;
width: 50px;
height: 50px;
line-height: 90px;
-webkit-border-radius: 50%;
-moz-border-radius: 50%;
border-radius: 50%;
}
.post blockquote cite {
position: relative;
display: block;
text-align: right;
margin-top: 5px;
color: #999;
}
</style>

BlockQuote Style 4 For WordPress:


blockquote{
font-family: Georgia, Times, "Times New Roman", serif;
font-size: 16px;
border-top: solid 2px #dddddd;
border-left: solid 2px #dddddd;
border-right: solid 2px #dddddd;
border-bottom: solid 2px #dddddd;
margin: 1em 0px;
padding: 1em 1em;
font-family: Georgia, Times, "Times New Roman", serif;
font-style: italic;
font-size: 1em;
min-height: 60px;
}
blockquote:before {
display: block;
float: left;
content: "\201C";
font-size: 100px;
margin-right: 10px;
color: #fff;
background-color: #03C9A9;
padding: 15px 12px 5px 8px;
width: 50px;
height: 50px;
line-height: 90px;
-webkit-border-radius: 50%;
-moz-border-radius: 50%;
border-radius: 50%;
}
blockquote cite {
position: relative;
display: block;
text-align: right;
margin-top: 5px;
color: #999;
}

#BlockQuote Style 5:


This was an awesome blockquote styleI found on codepen


awesome blockquotes


BlockQuote Style 5 For Blogger:


<style>
.post blockquote{
display:block;
background: #fff;
padding: 15px 20px 15px 45px;
margin: 0 0 20px;
position: relative;
font-family: Georgia, serif;
font-size: 16px;
line-height: 1.2;
color: #666;
text-align: justify; 
border-left: 15px solid #c76c0c;
border-right: 2px solid #c76c0c;
-moz-box-shadow: 2px 2px 15px #ccc;
-webkit-box-shadow: 2px 2px 15px #ccc;
box-shadow: 2px 2px 15px #ccc;
}
.post blockquote::before{
content: "\201C"; /*Unicode for Left Double Quotes*/
font-family: Georgia, serif;
font-size: 60px;
font-weight: bold;
color: #999; 
position: absolute;
left: 10px;
top:5px;
}
.post blockquote::after{
content: "";
}
.post blockquote a{
text-decoration: none;
background: #eee;
cursor: pointer;
padding: 0 3px;
color: #c76c0c;
}
.post blockquote a:hover{
color: #666;
}
.post blockquote em{
font-style: italic;
}
</style>  

BlockQuote Style 5 For WordPress:


blockquote{
display:block;
background: #fff;
padding: 15px 20px 15px 45px;
margin: 0 0 20px;
position: relative;
font-family: Georgia, serif;
font-size: 16px;
line-height: 1.2;
color: #666;
text-align: justify; 
border-left: 15px solid #c76c0c;
border-right: 2px solid #c76c0c;
-moz-box-shadow: 2px 2px 15px #ccc;
-webkit-box-shadow: 2px 2px 15px #ccc;
box-shadow: 2px 2px 15px #ccc;
}
blockquote::before{
content: "\201C"; /*Unicode for Left Double Quotes*/
font-family: Georgia, serif;
font-size: 60px;
font-weight: bold;
color: #999; 
position: absolute;
left: 10px;
top:5px;
}
blockquote::after{
content: "";
}
blockquote a{
text-decoration: none;
background: #eee;
cursor: pointer;
padding: 0 3px;
color: #c76c0c;
}
blockquote a:hover{
color: #666;
}
blockquote em{
font-style: italic;
}

Final Words!

So, this was the complete tutorial on how to customize blockquotes style in Blogger and WordPress. and I hope that you found it helpful and I’m sure it will benefit you a lot.

If you have any query's, or if I missed anything in this article please let me know, I would love to hear from you :)

Now tell me which is your favorite blockquote style? 

Tuesday, March 3, 2015

How To Make Blogger Template SEO Friendly

Blogger is most popular blogging platform hosted by Google. if you just want to create a blog, you can do so far free through Blogger.com and if you want to host blog on your own server with custom domain name, you can do so far under $50 per year.

Hoverer, Blogger is more SEO friendly blogging platform as compared to WordPress. but you can see, default blogger templates are developed many years ago and still not updated.

when I started my first blog on blogger I made biggest mistake that I used many templates on that blog without knowing template is SEO friendly or not. because I am beginner in blogging world.

Make Blogger Template SEO Friendly

There are several free blogger templates available on internet to download, but we must choose SEO friendly and attractive blog template. but many free blogger templates are not SEO friendly. So we should make some changes in blogger template to make it more SEO friendly.

Recommended: How To Create A Blog On Blogger Blogspot : Complete Guide For Beginner 

Today I am going to share tutorial on how to make blogger template SEO friendly. this tutorial will help you to make your blogger template fully SEO optimized.


How To Make Blogger Template SEO Friendly


#1. Show Post Title Before Blog Title In Google Search:


The first thing to find in custom template is the structure of the title tag, because the Title tag is the most important SEO factor of blog.

The question, such as whether it's a good title tag?

The default template of blogger has the title structure more or less, see below image as a example:

how Post Title Before Blog Title

Google shows only 65 characters of the title in search results. By default, in blogger, blog title shows before post title. This can affect on SEO ranking because post titles which have the main keywords got cut off because of the characters limit in Google search results.

To make Title tag SEO friendly find the following code in your template:

 Note:  While making any changes in blogger template, mistakes might be made. so backup your template.

<title><data:blog.pageTitle/></title>

Now replace that code with following code:

<b:if cond='data:blog.url == data:blog.homepageUrl'><title><data:blog.title/></title></b:if>
<b:if cond='data:blog.pageType == &quot;item&quot;'><title><data:blog.pageName/> | <data:blog.title/></title></b:if>
<b:if cond='data:blog.pageType == &quot;archive&quot;'><title>Archive for <data:blog.pageName/></title></b:if>
<b:if cond='data:blog.pageType == &quot;static_page&quot;'><title><data:blog.pageName/></title></b:if>
<b:if cond='data:blog.pageType == &quot;index&quot;'><b:if cond='data:blog.searchLabel'><title><data:blog.title/> - <data:blog.pageName/></title></b:if></b:if>
<b:if cond='data:blog.pageType == &quot;error_page&quot;'><title>Page Not Found</title></b:if>
<b:if cond='data:blog.pageType == &quot;index&quot;'><b:if cond='data:blog.url != data:blog.homepageUrl'><title><data:blog.pageTitle/> - All Post</title></b:if></b:if>

 Note:   If you are using custom blogger template, the structure of title tag has been modified, so it is better to be left it alone.

#2. Meta Description & Keyword Tags:


Another important SEO factor is meta description and keyword tag. If you ignore it you may loss huge amount of traffic from search engines, so just add proper meta description and keyword tags in your blogger template to make it more SEO friendly.

To add meta description and keyword tag in blogger template:

Find For <head> and Paste The Following Code Below <head> tag.

<meta content='Add your blog description here' name='description'/>
<meta content='Add your keywords here' name='keywords'/>

Replace Add your blog description here With Your Description (maximum 150 characters) and Add your keywords here (maximum 150 characters)With Your Keywords.

#3. Heading Tags:


There are many kinds of heading tags, from H1, H2, H3, to H6, but not all important heading tags existence, H1 tags is one of the most important. as far as I know there are three heading tags are quite influential role against on page SEO. The first is the H1 tag as described above and the next is the H2 and H3 tags.

H1 tags are generally used in the title of the blog, however much some blogspot templates that have been modified to dynamically perform the H1 tag. When the H1 tag located on the homepage of the blog title, whereas when it is on the page posts H1 tag located on the post title. The purpose of this modification is to optimize the post title in the Google search results.

I think the H2 and H3 tags role is not important as compared to H1 tag, but it would be nice if my friend use it to put the keywords in the tags so that the maximum.

Search for the below piece of code in your template:

<h3 class = "post-title entry-title 'itemprop =' name '> 

 Note:   If you find above code two times then go with the second result.

Now search for the following or exact looking code in your template.

<a expr:name='data:post.id'/>
<b: if cond = 'data: the post.title'>
<h3 class = "post-title entry-title 'itemprop =' name '>
<b: if cond = 'data: the post.link'>
<a expr:href='data:post.link'> <data: post.title /> </a>
<b: else />
<b: if cond = 'data: the post.url'>
<b: if cond = 'data: the blog.url! = Data: post.url'>
<a expr:href='data:post.url'> <data: post.title /> </a>
<b: else />
<data: post.title />
</ b: if>
<b: else />
<data: post.title />
</ b: if>
</ b: if>
</ h3>
</ b: if>

Replace above piece of code with following code.

<b: if cond = 'data: the blog.pageType! = & quot; index & quot;'>
<a expr:name='data:post.id'/>
<b: if cond = 'data: the post.title'>
<h1 class = "post-title entry-title 'itemprop =' name '>
<b: if cond = 'data: the post.link'>
<a expr:href='data:post.link'> <data: post.title /> </a>
<b: else />
<b: if cond = 'data: the post.url'>
<b: if cond = 'data: the blog.url! = Data: post.url'>
<a expr:href='data:post.url'> <data: post.title /> </a>
<b: else />
<data: post.title />
</ b: if>
<b: else />
<data: post.title />
</ b: if>
</ b: if>
</ h1>
</ b: if>
<b: else />
<a expr:name='data:post.id'/>
<b: if cond = 'data: the post.title'>
<h2 class = "post-title entry-title 'itemprop =' name '>
<b: if cond = 'data: the post.link'>
<a expr:href='data:post.link'> <data: post.title /> </a>
<b: else />
<b: if cond = 'data: the post.url'>
<b: if cond = 'data: the blog.url! = Data: post.url'>
<a expr:href='data:post.url'> <data: post.title /> </a>
<b: else />
<data: post.title />
</ b: if>
<b: else />
<data: post.title />
</ b: if>
</ b: if>
</ h2>
</ b: if>
</ b: if>

Not done yet! Now search and replace all h3.post-title with h1.post-title

All done! Now save your template, your template is optimized for search engines.

Conclusion


I hope this tutorial will help you to optimize your blogger template and I think all of the above is enough to make your blogger template SEO friendly. after making all these changes I am sure you will get good amount of traffic from search engines

If you still confuse then drop your question in comment box, I will come up with new article till then subscribe our newsletter to get next post directly to your inbox :).

Tuesday, January 27, 2015

How To Add Custom Robots.txt File In Blogger/Blogspot

 
Maybe you've heard about the term robots.txt. What is robots.txt? is it necessary in the settings? what if I leave it alone? There are probably many other questions you have, especially if you are newbie blogger.

To better understand the meaning of robots.txt, to make it more understandable, I have made this tutorial.

If you want to get your blog indexed and crawl your pages fast then you should add this custom robots.txt file in your blogger blog. as well as it's a part of search engine optimization so you must be aware of the terms. 

Also Read:

How It Works?


Robots.txt is a command for the search engine robots to explore or browse a pages of our blog. Robots.txt is arguably filter our blog from search engines. 

Let's say robot wants to visits a Webpage URL, example, http://www.example.com/about.html. Before it does so, it will check for http://www.example.com/robots.txt, and then it will access the particular webpage.

All the blogs already have a robots.txt file given by blogger/blogspot. By default robots.txt on blogs like this:
User-agent: Mediapartners-Google
Disallow:
User-agent: *
Disallow: /search
Allow: /
Sitemap: http://yourblogname.com/atom.xml?redirect=false&start-index=1&max-results=500
User-agent: Mediapartners-GoogleDisallow: User-agent: *Disallow: /searchAllow: / Sitemap: http://namablog/feeds/posts/default?orderby=UPDATED - See more at: http://blog.kangismet.net/2013/10/cara-setting-robotstxt-di-blogger.html#sthash.aSTFQuhf.dpuf


What Is The Meaning Of Above Codes?


User-agent: Mediapartners-Google
This command tells your blog to allow Adsense bots to crawl your blog. If you’re not using Google Adsense on your blog then simply remove this line.
 
Disallow:
This cammand prevents Search Engine bots from crawling pages on your blog.

User-agent: *
All Robot Search Engines / Search engine

Disallow: / search
Not allowed to crawl the search folder, like .... / search / label and ... search / search? Updated ... here lable is not inserted to search
because label is not a URL who estate towards one specific page. 

Example : 
http://www.shoutersclub.blogspot.com/search/label/SEO
http://www.shoutersclub.blogspot.com/search/SEO
 
Allow: /
This command tells allow all pages to be crawled, except that written on Disallow above. Mark (/) or less.


Sitemap:   
Sitemap: http://yourblogname.com/atom.xml?redirect=false&start-index=1&max-results=500


How To Prevent Robot On Certain Pages?

 
To prevent particular page from Google crawling just disallow this page using Disallow command. For example : if I don't want index my about me page in search engines. simply I will paste the code Disallow: /p/about-me.html  right after Disallow: /search.

Code will look like this :

User-agent: Mediapartners-Google
Disallow:
User-agent: *
Disallow: /search
Disallow: /p/about-me.html
Allow: /
Sitemap: http://yourblogname.com/atom.xml?redirect=false&start-index=1&max-results=500 

How To Add Custom Robots.txt File In Blogger ?


 Note :  Before adding custom robots.txt file in blogger you should keep one thing in your mind that if you are using robots.txt file incorrectly then your entire blog being ignored by search engines.

Step1
Go to your Blogger Dashboard

Step2
Now go to Settings >> Search Preferences >> Crawlers and indexing >> Custom robots.txt >> Edit >> Yes


how to add custom robots.txt file in blogger

Step3
Now paste your custom robots.txt file code in the box.

Step4
Now click on Save Changes button.

Step5
That's all, You are done! now you can see your robot.txt file. To view the robots.txt fine, please type in browser...

http://yourblogname.com/robots.txt

Custom Robots.txt

It's okay, your blog will still be crawled by search engine robots because as I mentioned before, every blog already possessed default robots.txt.


Final Worlds!


So friends! this was the brief tutorial on how to add custom robots.txt file in blogger, if you are a newbie blogger and you have missed the robot.txt then create one here to make your site SEO strong.

 If you still have any quires regarding this article then please let me know, You can leave your question in comment box.

Thanks for reading this tutorial and I’ll see you in the next one. till then Happy Blogging !:)

User-agent: Mediapartners-GoogleDisallow: User-agent: *Disallow: /searchAllow: / Sitemap: http://namablog/feeds/posts/default?orderby=UPDATED - See more at: http://blog.kangismet.net/2013/10/cara-setting-robotstxt-di-blogger.html#sthash.aSTFQuhf.dpuf